
Stop the Post-Hike Hobble: 3 Best Hiking Backpacks for Back Pain
Affiliate Disclosure: Some links on this page may be affiliate links. If you buy through them, Best Trail Backpacks may earn a small commission at no extra cost to you. As an Amazon Associate, I earn from qualifying purchases.
You know that feeling the morning after a long day on the trail? You wake up, swing your legs over the edge of the bed, and your lower back loudly protests.
I call it the Post-Hike Hobble.
Experienced trail observers see this exact scenario play out constantly. A hiker starts the day with an older pack, only to find the hip belt has lost its structural integrity. Within a few miles, the belt begins to slide down the hips. To compensate, they spend the rest of the day constantly shrugging their shoulders upward to keep the sagging load from dragging them backward. The resulting lower back strain is a direct consequence of a failing suspension system, not a lack of physical fitness.
A Common Trail Sight:
During rest stops on popular trails, it is easy to spot hikers who are struggling with their gear. They are usually the ones constantly adjusting their shoulder straps, rolling their shoulders, or leaning heavily on their trekking poles while standing. In almost every case, these adjustments are a subconscious attempt to relieve a hip belt that has slipped or a frame that is too long for their torso.
Here is the truth: hiking is not supposed to hurt. While many hikers blame their physical conditioning, a massive amount of trail-induced back fatigue is actually a gear issue. Most of the time, the culprit is a poorly fitting backpack that quietly overloads your lower back, mile after mile.
The good news is that this is highly preventable. Once you understand how your pack distributes weight, you can choose gear designed to work with your body instead of fighting it.
Product Name
Best For
Key Strength
Main Tradeoff
Price Tier
Hot climates and maximum back ventilation
Tensioned Anti-Gravity mesh distributes load off the vertebrae
LT version has fixed torso steps, limiting micro-tuning
$$$
Carrying heavy loads and gear-heavy trips
Pivoting harness moves with your natural walking gait
High starting weight is overkill for lightweight loads
$$$
Dynamic, fast-paced trail movement
Active Spine technology mimics natural spinal rotation
One-size-fits-most fixed harness frame demands a perfect initial fit
$$$
Osprey Atmos AG LT (Lightweight) 65 / Aura AG 65
Best For: Hot climates and maximum back ventilation
Key Strength: Tensioned Anti-Gravity mesh distributes load off the vertebrae
Main Tradeoff: LT version has fixed torso steps, limiting micro-tuning
Price Tier: $$$
Gregory Baltoro 65 / Deva 60
Best For: Carrying heavy loads and gear-heavy trips
Key Strength: Pivoting harness moves with your natural walking gait
Main Tradeoff: High starting weight is overkill for lightweight loads
Price Tier: $$$
Mammut Ducan Spine 50-60
Best For: Dynamic, fast-paced trail movement
Key Strength: Active Spine technology mimics natural spinal rotation
Main Tradeoff: One-size-fits-most fixed harness frame demands a perfect initial fit
Price Tier: $$$
Pricing Guide: $ = Under $100 USD | $$ = $101 to $249 USD | $$$ = Over $250 USD.
Why Your Backpack Causes Back Pain
A backpack is not just a storage bag. It is a load-bearing suspension system. When that system fails, your body bears the brunt of the weight.
There are four primary reasons backpacks cause back fatigue on the trail. Understanding these mechanics is the first step toward finding relief.
1. The Torso Mismatch
Many people shop for a pack based on their overall height. However, height is a misleading metric because two hikers of the same height can have vastly different proportions.
The measurement that actually matters is your torso length. This is the distance from the bony bump at the base of your neck (the C7 vertebra) down to the top of your hip bones (the iliac crest).
Tip: To find your C7 vertebra, tilt your head forward and feel for the most prominent bony bump where your neck meets your shoulders.
Your back muscles and spine are strongest when the pack’s load sits close to your natural center of gravity. If the pack is too long or too short, the frame cannot align with your body. Instead of distributing the weight, the suspension transfers the load directly into your shoulders and lumbar region.

2. The Hip Belt Failure
Your hips are built to carry heavy weight, not your shoulders. In a properly aligned system, approximately 80% of your pack’s weight should rest on the iliac crest. This skeletal shelf is designed to transfer weight directly down through your legs and into the ground.
When a hip belt sits too high, too low, or slides down over time, that weight migrates back to your shoulders. By mid-afternoon, you find yourself hunched forward to balance the load. A supportive hip belt should feel snug around the top of your hips, locking the weight onto your skeletal foundation.

3. The Suspended Mesh Effect
Many premium packs feature a suspended mesh back panel. This design stretches a tensioned mesh screen across the frame, creating a physical gap between your back and the load.
This gap serves two practical purposes. First, it allows air to circulate, preventing the heavy sweat buildup that can cause skin irritation. Second, it prevents the backpack from “barreling” (bowing outward) against your spine. Without this suspension gap, a heavy pack rests flat against your back, forcing your upper body to lean forward to compensate.

4. The Weight of Unnecessary Gear
Even the most advanced suspension system will cause discomfort if you are carrying more weight than your body is prepared for. While dynamic frames help distribute the load, the most effective way to reduce back strain is to pack lighter.
Take a critical look at your gear list. Removing heavy, unused items is a practical, free step toward improving your comfort on the trail.
3 Best Backpacks for Back Comfort and Load Transfer
1. Osprey Atmos AG LT (Lightweight) 65 (Men’s) & Aura AG 65 (Women’s)
Best For: Hikers who run hot, sweat heavily on climbs, or experience upper-back tension from stiff, poorly ventilated back panels.ed packs.
Why It Stands Out: The Atmos and Aura are widely recognized for their body-contouring fit. The foundation of this comfort is the Anti-Gravity (AG) suspended mesh system. Instead of traditional foam padding resting against your spine, a single continuous sheet of tensioned mesh wraps from the shoulder blades down to the hip belt. This design helps reduce localized pressure points along the lower back and shifts the load outward to the hips.
Expert Suspension Insight:
The Osprey Anti-Gravity mesh is exceptionally effective at distributing weight, but it does have a distinct feel. When you first put the empty pack on, the high-tension mesh can feel snug and slightly restrictive around your hips. However, once you load the pack and begin walking, that tension translates into a highly stable fit that moves smoothly with your body.
Key Specs:
- Weight: 4.07 lbs (S/M Men’s LT) / 4.6 lbs (Women’s Aura)
- Capacity: 65 Liters
- Load Range: 30 to 40 lbs
- Frame Type: 4mm powder-coated peripheral frame

Men’s vs. Women’s Fit
- The Atmos (Men’s): Uses a standard torso sizing system (S/M and L/XL) paired with an adjustable hip belt designed for a wider hip structure.
- The Aura (Women’s): Features a shorter torso rise, narrower shoulder harness spacing, and a shaped hip belt angled for a more pronounced hip shelf. This is a dedicated design built to match different anatomical proportions.
Pros
Anti-Gravity mesh minimizes direct back contact and reduces heat buildup.
Adjustable hip belt allows quick, on-the-fly fit customization.
Side panel zipper provides access to buried gear without unpacking.
Highly durable 500D (denier, a measure of fabric density and weight) high-tenacity nylon base resists trail wear.
Cons
The LT (Lightweight) version uses a fixed torso adjustment ladder with fewer micro-tuning options.
The suspension frame can flex noticeably if loaded past 40 pounds.
High-tension frame makes the hip belt feel stiff when putting the pack on.
Verdict & Fit Logic:
2. Gregory Baltoro 65 (Men’s) & Deva 60 (Women’s)
Best For: Multi-day backpackers carrying substantial loads, such as camera gear, cold-weather sleeping systems, or group supplies.
Why It Stands Out: Carrying heavy weight requires a pack that moves with your body rather than resisting your natural stride. The Baltoro and Deva feature the FreeFloat A3 suspension system. This design allows the shoulder harness and hip belt to pivot independently as you walk. On uneven or technical terrain, the pack shifts with your hips, helping to manage the twisting forces that can lead to lower back fatigue.
Key Specs:
- Weight: 5.25 lbs (Large Baltoro) / 4.96 lbs (Medium Deva)
- Capacity: 65 Liters (Baltoro M/L) / 60 Liters (Deva S)
- Load Range: Up to 50 lbs
- Frame Type: Perimeter alloy steel frame with fiberglass cross-stay (internal support rods that prevent the pack from sagging under heavy weight)

Men’s vs. Women’s Fit
- The Baltoro 65: Available in three distinct torso sizes (Small, Medium, Large), which is a valuable feature for finding an exact fit if you fall between standard sizes.
- The Deva 60: Features a contoured 3D shoulder harness and hip belt angled for a female torso. The extra-small sizing accommodates shorter torso lengths without requiring harness modifications.
Pros
FreeFloat pivoting harness reduces rotational strain on the lower back.
Silicone lumbar pad prevents the pack from sliding down under heavy loads.
Wide U-zip front opening allows easy access to the main compartment.
Multiple torso sizes make finding an accurate fit straightforward.
Cons
Starting weight of over 5 pounds is heavy if you carry a light gear setup.
Thick foam back panel runs warmer than fully suspended mesh designs.
Rain cover is not included with all models.
Expert Fit Recommendation:
While a starting weight near five pounds might seem high for minimalist hikers, the robust frame of the Baltoro and Deva manages heavier loads with incredible efficiency. If you are carrying over 35 pounds, the suspension system offsets its own weight by transferring the load securely to your skeletal structure, preventing the sagging that typically causes lower back fatigue.
Verdict & Fit Logic:
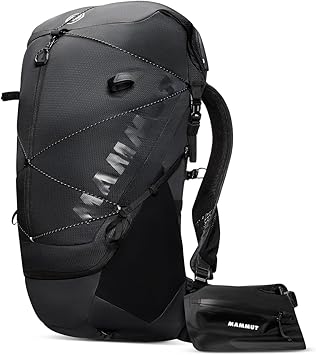
3. Mammut Ducan Spine 50-60
Best For: Experienced, fast-paced hikers who navigate technical trails and want a pack designed for natural body movement.
Why It Stands Out: Traditional internal frame packs can feel rigid, forcing your back muscles to work harder to maintain balance on uneven ground. The Ducan Spine addresses this with Active Spine Technology. The internal frame features a flexible steel rod that twists and pivots at the shoulders and hips. As your body rotates naturally during a stride, the pack moves with you, which helps distribute the cumulative fatigue in your core and lower back.
Key Specs:
- Weight: 3.35 lbs (1.52 kg)
- Capacity: Expandable 50 to 60 Liters
- Frame Type: Flexible steel internal frame
- Material: 210D (denier, a measure of fabric density and weight) Nylon base (PFC-free DWR, which stands for Durable Water Repellent coating)
Pros
Flexible frame system mimics the natural movement of your spine.
Expandable roll-top closure allows you to adjust the volume based on trip length.
Clean, streamlined profile keeps the weight centered close to your body.
Lightweight design reduces overall strain on long-distance hikes.
Cons
One-size-fits-most system has a fixed torso length (best suited for 18 to 20-inch torsos).
High risk of an uncomfortable fit for exceptionally tall or short hikers.
Pack can become top-heavy if fully expanded without careful packing.
Verdict & Fit Logic:
How to Fit Your Pack to Reduce Avoidable Strain
Even an advanced suspension system cannot perform properly if the pack is adjusted incorrectly. Taking a few minutes to adjust your pack before a hike can make a significant difference in comfort.
- Loosen Every Strap First: Before putting the pack on, loosen the shoulder harness, hip belt, load lifters, and sternum strap. Starting from a blank slate ensures you are adjusting the pack to your body rather than fighting previous settings.
- Secure the Hip Belt First: Place the loaded pack on your back and position the hip belt so it rests directly over your hip bones. Buckle and tighten the belt until it feels snug. You should feel the weight settle onto your hips, relieving the pressure on your shoulders.
- Adjust the Shoulder Straps Second: Pull the shoulder straps downward until they wrap comfortably over your shoulders. They should rest flat against your body without digging into your collarbones.
- Fasten the Sternum Strap: Position the chest strap about an inch below your collarbones. Tension it just enough to pull the shoulder straps slightly inward, freeing up your arm movement without restricting your breathing.
- Tension the Load Lifters Last: Locate the small straps at the top of the shoulder harness, angled back toward the frame. Gently pull them forward to a 45-degree angle. This shifts the upper portion of the load closer to your upper back, stabilizing the pack and preventing it from pulling you backward.

Pro Tip: Walk around your home with a loaded pack for five to ten minutes before heading to the trailhead. It is much easier to make micro-adjustments in a controlled environment than on a steep climb.
Bonus Trail Tip: Consider using trekking poles. Pairing a well-adjusted backpack with trekking poles is one of the most effective ways to support your back. Poles encourage an upright posture, reduce forward leaning, and distribute shock away from your lower spine and knees, especially during steep descents.
Choosing Comfort on the Trail
The Post-Hike Hobble does not have to be an inevitable part of your outdoor experience. Often, it is simply a sign that your current gear is not distributing weight effectively.
By selecting a pack designed for proper load transfer, measuring your torso accurately, and taking the time to dial in the fit, you can focus on the trail instead of physical fatigue. The Osprey Atmos and Aura remain excellent, highly ventilated options for moderate loads. The Gregory Baltoro and Deva provide the robust frame structure needed for heavy hauling, while the Mammut Ducan Spine offers a unique, flexible solution for dynamic, technical movement.
Treat your backpack as a supportive piece of equipment rather than a simple gear bag. Investing a little time into understanding your fit will reward you with more comfortable, enjoyable miles on the trail.
What changed for you once you finally found a pack that fit? Let me know in the comments below.
Founder & Gear Research Editor

Sonia Zannoni
I’m Sonia, the founder and Gear Research Editor behind Best Trail Backpacks. I research hiking backpacks through a comfort-first lens, with a focus on fit, back pain, ventilation, practical trail use, and the small design details that can make or break a hike.
I do not pretend to personally test every backpack I cover. Instead, I compare manufacturer specifications, product details, verified buyer patterns, and practical fit guidance to help casual hikers make better buying decisions without getting buried in gear jargon.
My goal is simple: help you choose a backpack that fits your body, your trail plans, and your budget, without the usual overwhelm.
About the Founder