
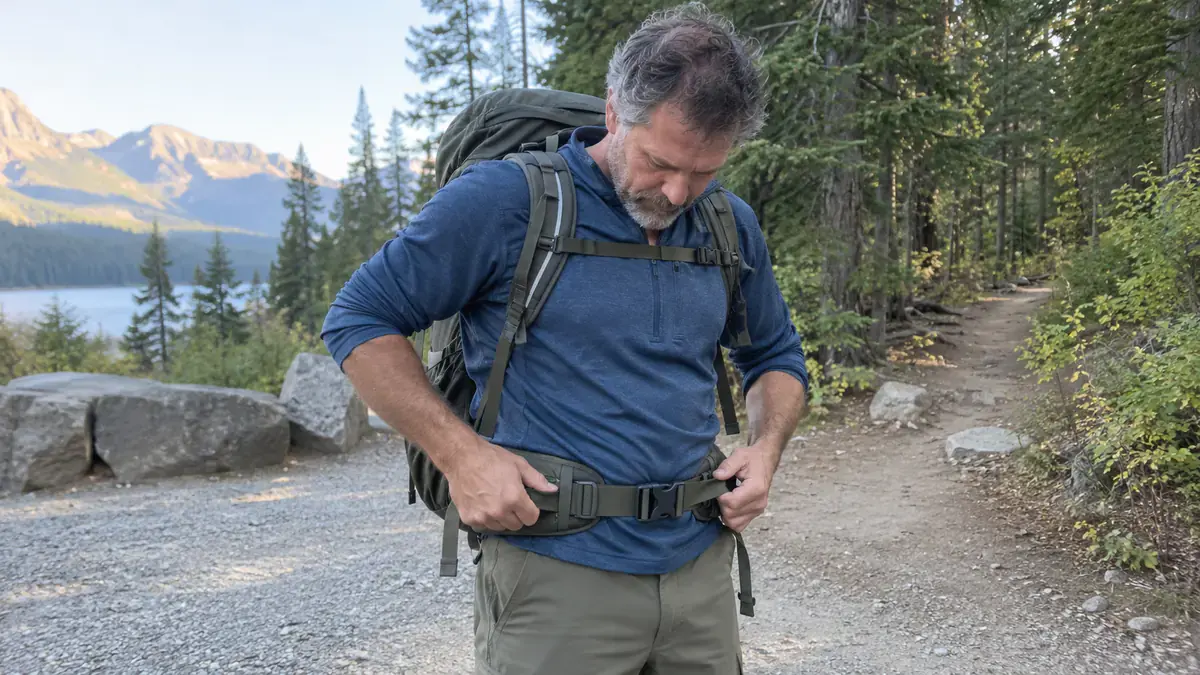
How to Adjust Hiking Backpack Straps So the Weight Sits on Your Hips
The pack was sold as your size, yet it feels wrong, so you pull the shoulder straps tighter. Each pull makes it worse. The hip belt climbs toward your waist and the straps start pressing into the sides of your neck.
It’s common to adjust this way, one strap at a time, because nobody explains the order. A pack can be the right size and still ride badly when its straps are set out of sequence or pull against each other.
That isn’t your fault, and it usually isn’t a bad pack. What helps is knowing how to adjust hiking backpack straps in the right order, which strap to change for what you’re feeling, and how to spot the problems no strap can fix.
Below, you’ll set the four straps in the order the makers agree on, with a quick check for each. You’ll fix what you feel on the trail, and within a few minutes you’ll know whether the pack itself is the problem.
TL;DR: How to Adjust Hiking Backpack Straps
- The order: set the torso length first if your pack has one, then the hip belt, shoulder straps, load lifters and sternum strap
- The two checks that matter most: the belt padding sits on top of your hip bones, and the shoulder straps wrap your shoulders without carrying the weight
- Snug, not stiff: over-tight load lifters, sternum strap or hip belt make the fit worse, not better
- If the belt still won’t sit on your hip bones, or the anchor points won’t land near the top of your shoulder blades after a torso reset, it’s the pack size, not the straps
Before You Touch a Strap: Load the Pack and Check the Torso Setting
Start with the pack loaded the way you’ll carry it, or about 15 pounds if you’re setting it up at home, with every strap loosened a little. If your pack has an adjustable torso, set that first, because no strap can make up for a torso length set wrong.
You’re probably standing in the living room with a half-packed bag, wondering why the straps felt fine empty. Weight settles wherever the belt and harness let it, so a pack that felt snug with nothing inside can sag onto your shoulders once the water and layers go in.
That’s why REI’s fitting advice starts with about 15 pounds in the pack. You’re setting each strap against real weight, the way it will ride on the trail, rather than against an empty shell.
REI calls the torso setting the first and most important adjustment on packs that have one, because the adjustment straps can’t make up for a suspension set at the wrong length.
Each brand moves its torso setting a different way, so your pack’s manual is the place to see how yours works. Set it to your torso length, then leave it alone while you work through the straps.
Torso length runs from the bony bump at the base of your neck down to the line across the top of your hip bones, which is how REI measures it. If you don’t know yours, the guide on how to measure your torso walks you through it at home.
Quick Tip: Loosen every strap a little before you start. That way you set each one from slack, instead of fighting whatever you pulled last time.
If Your Pack Is a Daypack
If you read a fitting guide written for a big pack and couldn’t find half the straps it names, your daypack isn’t missing anything. Many daypacks have no adjustable torso and only a light hip belt.
Deuter sizes its smaller packs as Regular, SL and EL rather than giving them an adjustable back length, which it uses from about 35 liters. With a pack like that, the size you chose is your torso setting.
The order still works with whatever your pack has: the belt first if there is one, then the shoulder straps, then any stabilizer straps, then the sternum strap.
On smaller packs carrying lighter loads, Deuter says the stabilizer straps fine-tune where the pack sits, and their angle can be much smaller or barely there.
So don’t expect your daypack’s top straps to show the steep angle of a framed pack, one with a stiff internal frame or frame sheet behind the back panel.
How to Adjust Hiking Backpack Straps in the Right Order
Tighten the hip belt first, so the padding sits on your hip bones. Then pull the shoulder straps down and back until they wrap your shoulders without carrying the weight. Snug the load lifters, then clip the sternum strap where your arms swing freely and you can breathe easily.
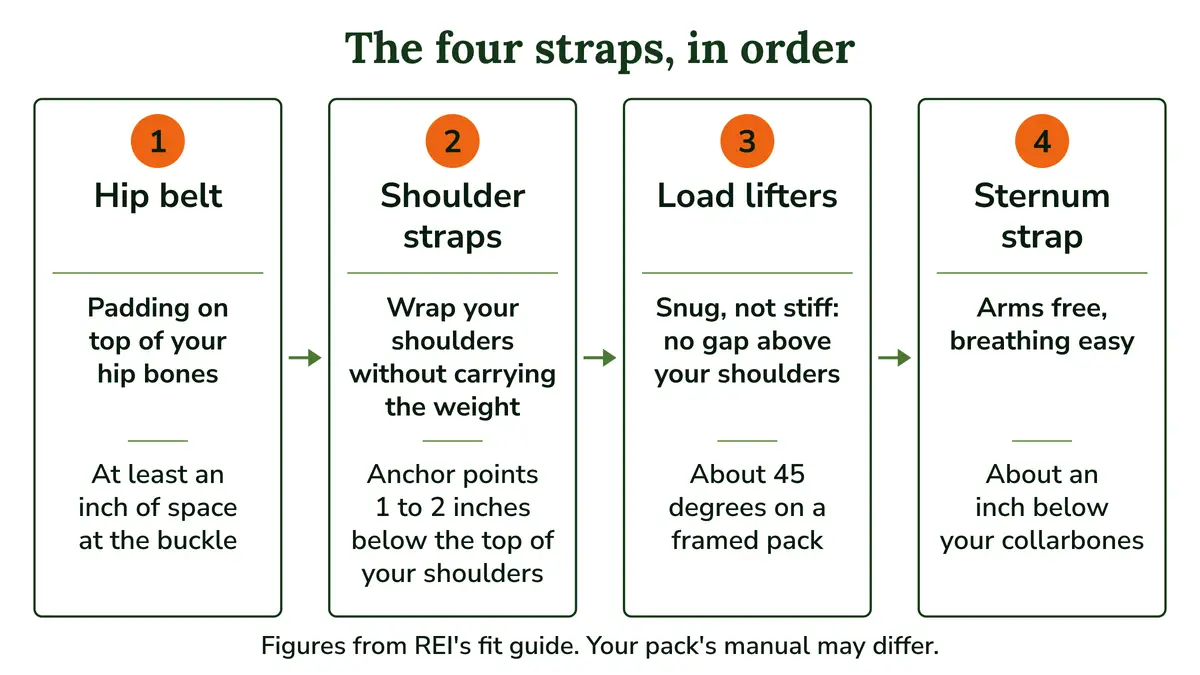
REI’s fit guide sets the straps in this order, and the other makers I read follow nearly the same one. Each step below ends with a check, so you know when to stop tightening and move on.
The order matters because the straps pull against each other. Change one and it shifts the others, so a pack can feel wrong even when every strap seems tight.
1. The Hip Belt: Set It on Your Hip Bones First
Put the pack on and center the hip belt so its padding hugs the top of your hip bones. That’s the iliac crest, the bony ridge you can feel at the top of each hip. Buckle it and pull it snug, without pinching.
REI also wants the padding to run slightly past the bony point at the front of each hip.
The belt goes first because it sets where the whole pack sits. REI’s goal is the majority of the load on your hips, because your legs have some of the strongest muscles in your body.
Check: look down at the buckle. REI wants at least an inch of space between each end of the padding and the buckle when the belt is snug.
2. The Shoulder Straps: Snug Around Your Shoulders, Not Holding the Weight
Pull both shoulder straps down and back in small tugs until they wrap closely around your shoulders. REI’s point is that they hold the pack close but shouldn’t carry much weight, or your shoulders, neck and upper back end up doing the work.
There’s a second reason to go easy here. Shoulder strap tension also moves the hip belt: tightening the straps raises it and loosening them lowers it, as REI describes. Crank them hard and you lift the belt off the bones you just set it on.
Check: find the anchor points, where the straps leave the top of the pack. REI places them 1 to 2 inches below the top of your shoulders, roughly level with the top of your shoulder blades.
If the anchor points land well above or below that, the belt is at the wrong height or the torso setting is off.
3. The Load Lifters: Pull the Top of the Pack In
Load lifters are the short straps running from the top of each shoulder strap back to the pack. Snug them and the top of the pack comes in, so it runs straight up and down your back instead of leaning away, as Osprey puts it.
Gregory describes the same job another way: the load lifters draw the weight toward your center of gravity. On a framed pack, REI and Osprey both put the right angle at about 45 degrees.
Pull them snug, not stiff. REI warns that too much tension here can pinch your shoulder joints.
Check: the top of the pack sits close to your upper back, and the shoulder straps still rest on your shoulders.
Quick Tip: If a gap opens between the top of the shoulder straps and your shoulders after you snug the load lifters, they’re too tight. Ease them off until the straps sit on your shoulders again.
4. The Sternum Strap: Arms Free, Breathing Easy
Clip the sternum strap across your chest. REI places it about an inch below your collarbones, and you tighten it only until the shoulder straps stay put and your arms move freely.
The sternum strap sets the distance between the shoulder straps and keeps them from sliding off your shoulders, a role REI and Gregory both give it. Pull it harder than that and REI says it distorts the harness, squeezes your chest and restricts your breathing.
Check: take a full, deep breath and swing your arms. If either feels restricted, loosen the strap a little.
When the Makers’ Numbers Don’t Match
The four makers broadly agree on the order and the idea behind it, but their exact placements differ. Here’s how REI, Osprey, Deuter and Gregory describe the same three settings.
What it sets
REI
Osprey
Deuter
Gregory
Hip belt position
Padding hugs the top of the hip bones
Over the upper half of the pelvis bone
Center of the hip fins over the top of the hip bone
Pad about 1 inch (2.5 cm) above the iliac crest
Sternum strap height
About 1 inch below the collarbones
No height given
No height given
About heart height
Load lifter angle
About 45 degrees
Around 45 degrees
30 to 45 degrees, much smaller on small packs
No angle given
Hip belt position
REI: Padding hugs the top of the hip bones
Osprey: Over the upper half of the pelvis bone
Deuter: Center of the hip fins over the top of the hip bone
Gregory: Pad about 1 inch (2.5 cm) above the iliac crest
Sternum strap height
REI: About 1 inch below the collarbones
Osprey: No height given
Deuter: No height given
Gregory: About heart height
Load lifter angle
REI: About 45 degrees
Osprey: Around 45 degrees
Deuter: 30 to 45 degrees, much smaller on small packs
Gregory: No angle given
The order differs a little too. Deuter clips the sternum strap before its stabilizer straps, while REI and Osprey set the load lifters first. Small differences like these are normal, and none of them changes the goal.
I’d go by your own pack’s manual and the checks above, rather than chasing one correct number. The checks tell you what’s happening on your body, and that’s what decides whether the pack is carrying well.
If one thing still feels off after all four, the symptom list further down names the strap to change.
Three Strap Habits That Make a Good Pack Feel Worse
Three beliefs make strap problems worse: that the hip belt must carry a set percentage of the weight, that tighter means more support, and that load lifters should lift the straps off your shoulders. The makers want the hips to carry the load, and every strap stays snug, not cranked.
When a pack feels heavy, the instinct is to crank every strap. For a minute it does feel more secure. Then the belt rides up or the straps start to bite, and you tighten again.
The aim is snug enough to hold the load where it belongs and loose enough to move and breathe. Each strap goes wrong in its own way once it’s pushed past that point.
1. “The Hip Belt Has to Carry 80 Percent of the Weight”
You’ll often see a precise figure repeated, such as 80 percent. None of the four makers I read gives a percentage.
REI says the majority of the load belongs on your hips, and Deuter says the hip belt carries the main load. Osprey and Gregory say the belt takes the weight off your shoulders.
A number like that is hard to use anyway, because you can’t feel a percentage. Go by the checks instead: the belt sits on your hip bones, and the shoulder straps wrap you without pressing down.
2. “Tighter Means More Support”
Past snug, a strap stops holding the pack in place and starts pressing on you. REI and Osprey both warn against over-tightening, and each strap causes its own problem:
- An over-tight hip belt pinches your hips instead of resting on the bone, which is why REI says snug without pinching.
- Over-tight shoulder straps lift the belt off your hips and load your neck and upper back.
- Over-tight load lifters can pinch your shoulder joints, according to REI.
- An over-tight sternum strap distorts the harness and restricts your breathing, according to REI.
3. “Load Lifters Should Lift the Straps Off Your Shoulders”
The name suggests lifting, so some hikers pull these until the shoulder straps rise off their shoulders, because that feels like they’re working. REI says a gap above your shoulders means the load lifters are too tight.
Their real job is drawing the top of the pack in toward your back, which is how Osprey and Gregory both describe them. Once the pack stops leaning away from you, they’ve done their work.
Fixes by Symptom: Which Strap to Change for What You Feel
Match the strap to what you feel. A belt riding up or sliding down usually comes down to shoulder strap tension or a loose belt. Straps digging at the neck, slipping off the shoulders, or a pack pulling you backward point to the load lifters, sternum strap or torso setting.
Here’s the short version, symptom by symptom, with the strap to check first and the sign that points to the pack’s size instead.
What you feel
Check first
What to try
Sign it’s the size
Belt rides up to your waist
Shoulder straps
Loosen them a little
Belt still won’t sit on the hip bones after a torso reset
Belt slides down
Hip belt, then shoulder straps
Re-tighten the belt, snug the shoulder straps slightly
Padding ends nearly meet at the buckle
Straps dig at the neck, padding under the armpits
Torso setting, then sternum strap
Reset the torso, then the sternum strap
Still there after a reset
Straps cut in or slip off the shoulders
Sternum strap, then torso setting
Check the sternum strap height
Padding ends short of the shoulders after a reset
Pack sways or pulls you backward
Load lifters
Snug them, then check how it’s packed
A gap between back and pack after a reset
Belt rides up to your waist
Check first: Shoulder straps
What to try: Loosen them a little
Sign it’s the size: Belt still won’t sit on the hip bones after a torso reset
Belt slides down
Check first: Hip belt, then shoulder straps
What to try: Re-tighten the belt, snug the shoulder straps slightly
Sign it’s the size: Padding ends nearly meet at the buckle
Straps dig at the neck, padding under the armpits
Check first: Torso setting, then sternum strap
What to try: Reset the torso, then the sternum strap
Sign it’s the size: Still there after a reset
Straps cut in or slip off the shoulders
Check first: Sternum strap, then torso setting
What to try: Check the sternum strap height
Sign it’s the size: Padding ends short of the shoulders after a reset
Pack sways or pulls you backward
Check first: Load lifters
What to try: Snug them, then check how it’s packed
Sign it’s the size: A gap between back and pack after a reset
Whatever the symptom, change one strap at a time, walk a few steps, and check again. Two changes at once make it hard to tell which one helped.
The Hip Belt Rides Up to Your Waist
You keep pushing the belt back down onto your hips, and a mile later it’s at your waist again. Most often the shoulder straps are too tight and pulling it up.
Loosen them a little and let the belt settle back onto your hip bones, which is REI’s fix for a belt sitting too high. If it won’t stay there after that, the torso setting is the next thing to check.
The Hip Belt Slides Down
A belt can slide down too, and the fix is close to the opposite. Re-tighten it on your hip bones, then snug the shoulder straps slightly. Since tightening the shoulder straps raises the belt, a small pull brings it back where it belongs.
If the padding ends nearly meet at the buckle when the belt is tight, the belt may simply be too big for your hips. REI’s rule is at least an inch of clearance on each side of the buckle, and less than that can mean you need a smaller belt.
Quick Tip: If the belt keeps sliding, check whether it’s slipping down your body or the webbing is loosening through the buckle. They’re different problems, and webbing that won’t hold in the buckle is one for the pack maker.
The Straps Dig at Your Neck or the Padding Runs Under Your Armpits
Deuter describes this as a back length set too long. The anchor points sit close together at your neck, the shoulder padding runs under your armpits, and the straps chafe your neck and arms. The load can tilt backward, too.
Reset the torso setting first, then the sternum strap, since the strap can only work with wherever the harness lands.
If the harness still lands in the wrong place at every torso setting, the pack’s range is probably too long for your back, and no strap changes that. A smaller size is the next thing to try.
Osprey describes its women’s packs as shorter and narrower, so packs built around a women’s fit are one place to look.
The Straps Cut In or Slip Off Your Shoulders
This is the opposite case. Deuter’s signs of a back length set too short are shoulder padding that ends short, and straps that cut in and slip off your shoulders.
Before you change the torso setting, check the sternum strap. It’s the strap that keeps the shoulder straps on your shoulders, so one sitting at the wrong height can look like a torso problem. If the straps still slip with it set, reset the torso.
The Pack Sways or Pulls You Backward
Everything feels fine at the trailhead, and after the first climb the pack starts swinging or tugging you backward. Snug the load lifters first, so the top of the pack sits close to your back.
Then look for a gap between your back and the pack. Osprey says a gap there means the back length needs adjusting.
After the straps, the other common cause is where the heavy gear sits inside the pack. That’s worth checking against how to pack a hiking backpack before you change anything else.
If you’ve worked through the fix for your symptom and it keeps coming back, the next section shows how to tell whether it’s the pack.
Pain or numbness that lasts after the pack is off is something to see a clinician about, not a strap to adjust.
Adjustment Problem or Wrong Size? How to Tell
If the straps are set in order and something still won’t land, check the fit points. Anchor points that won’t reach the top of your shoulder blades, a belt that can’t rest on your hip bones, or padding under your armpits after a torso reset points to the pack.
This is the worry underneath most strap fiddling: that you bought the wrong pack and the money’s gone. Most of the time it’s an adjustment problem, and a few checks tell you when it isn’t.
Set the straps in order first and reset the torso once. REI is clear that straps can’t make up for a torso set wrong, so do that before you judge the pack. Then run these checks:
- The anchor points won’t land near the top of your shoulder blades, 1 to 2 inches below the top of your shoulders, at any torso setting. That’s REI’s anchor point check, and missing it means the harness doesn’t match your back.
- The belt can’t sit on your hip bones, or you have less than an inch of clearance at the buckle with it snug. REI says that can mean you need a smaller belt.
- On a framed pack, the load lifters stay far from about 45 degrees at every torso setting, the angle REI and Osprey aim for. That can be a sign the harness doesn’t match your back.
- The shoulder padding runs under your armpits or ends short of your shoulders, which Deuter gives as the signs of a back length set too long or too short. If no torso setting fixes it, the pack’s range doesn’t fit you.
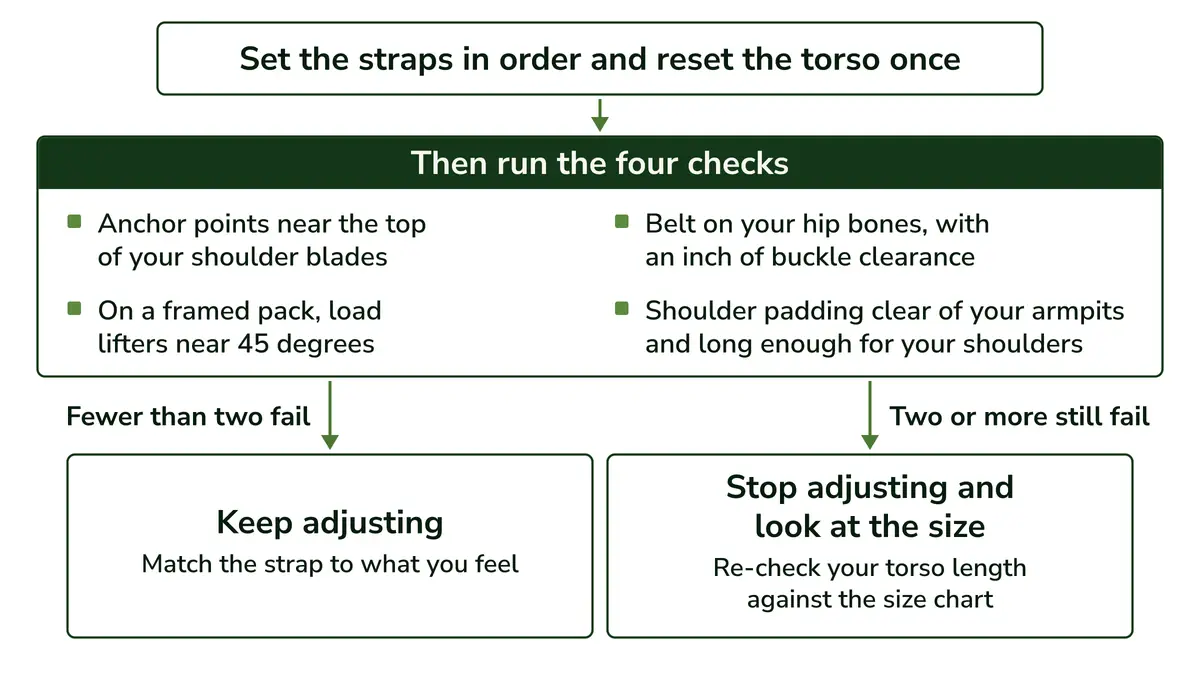
If two of these still fail after a torso reset, I’d stop adjusting and look at the size. More tension won’t move a harness that was built for a different back.
Start by re-checking your torso length against the brand’s size chart. If you’re shopping again, go through what to check before you buy so the next pack’s range covers yours.
And if you’re replacing a pack that never carried well, my roundup of packs chosen for back comfort is a good place to start.
Small Shifts for Steep Ground, Easy Stretches and Long Days
Once the pack fits, small changes help as the ground changes. On easy, flat stretches, Gregory moves more weight back to your hips, and on steep or uneven ground your shoulders take a little more for control. On long days, shifting the load between hips and shoulders eases pressure points.
It’s common for everything to sit well at the start, then feel like a different pack by the top of a long climb. That’s usually a cue for a small shift, not a full refit.
Gregory’s fit guide gives the clearest version. On flatter ground and longer stretches, loosen the shoulder straps, then tighten the load lifters, which moves weight onto the hip belt.
On steep climbs or uneven, technical ground, Gregory reverses it: loosen the load lifters, then tighten the shoulder straps, so your shoulders take a bit more for control.
Deuter moves the same straps the other way. On its larger packs, it loosens the shoulder stabilizers, its name for the load lifters, on easy terrain to let air move, and tightens them for control on challenging ground.
Since Gregory and Deuter move the same straps in opposite directions, this is one place to follow your own pack maker. Both are after a little more control when the trail gets rough.
That control costs some of the hip carry. So shift back once the trail flattens, rather than leaving the pack set for the steepest part of the day.
On long days, Deuter suggests alternating tension to move the load between your hips and shoulders. REI’s version is simple: tighten the shoulder straps and loosen the belt for a while, then reverse it, and take the pack off at breaks.
Before your next hike, load the pack with about 15 pounds at home, loosen every strap, and run through the four in order with the check for each. It takes a few minutes, and you’ll start the trail with the weight where the pack was built to carry it.
Founder & Gear Research Editor

Sonia Zannoni
I’m Sonia, the founder of Best Trail Backpacks. I don’t test gear myself. For every pack I cover, I read the manufacturer’s specs and sizing charts and look for what owners report again and again.
Fit comes first, because a pack that doesn’t match your torso and hips will hurt no matter what it cost. My goal is to help you choose a pack that suits your body, your trip and your budget.
About the Founder
