
How to Read a Topographic Map for Hiking: Contour Lines, Scale and Matching It to the Trail
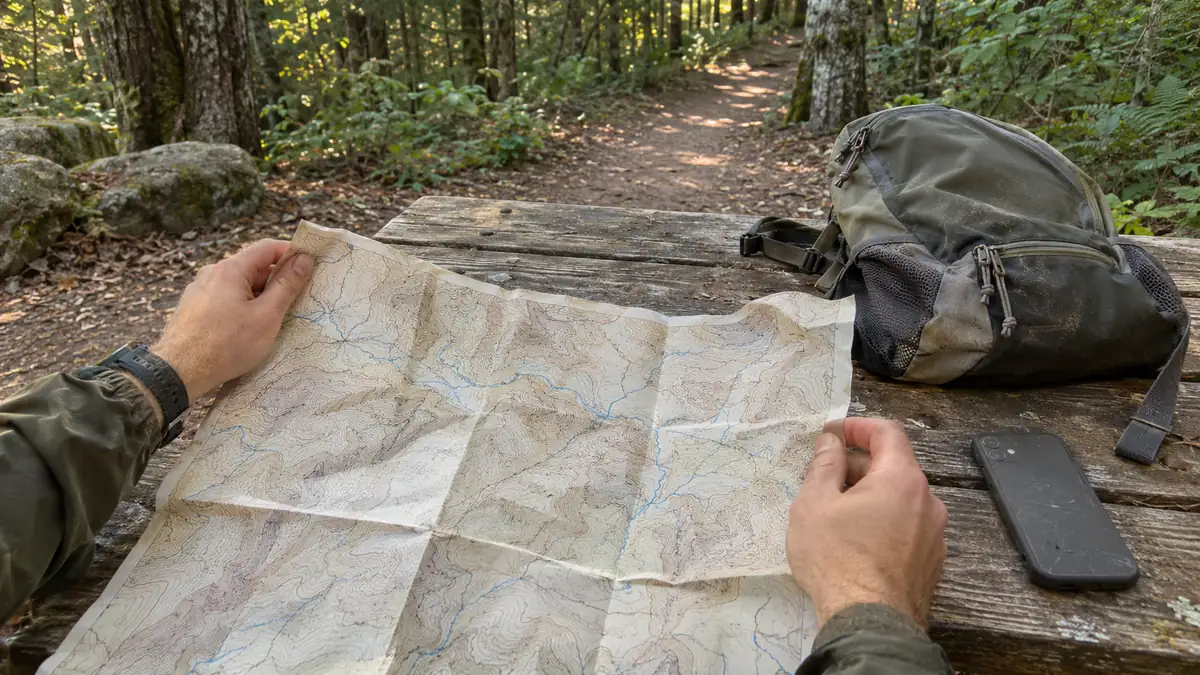
The paper map is in your pack because every list called it your backup. Unfolded, the brown lines look like a fingerprint, and you can’t tell uphill from downhill. So the backup is the one thing you can’t use, and the phone stays the only thing you trust.
That’s a common reaction, and it isn’t a lack of ability. A topo map is written in a code of lines, an interval and a scale, and nobody hands you the key with the map.
Learning how to read a topographic map is mostly learning that key: telling steep ground from flat, which way is up, how far it is, and whether you’re still on the right trail.
By the end, you’ll be able to look at a route on the map at your kitchen table and say where it climbs hardest, which side drops away, and what you’d see if you walked past your turn.
TL;DR: How to Read a Topographic Map
- Read the margin first: the contour interval is what turns lines into feet or meters, and it changes from map to map (below the bar scale on a US Geological Survey map, in the margin notes on a Natural Resources Canada map).
- Lines close together mean steep ground and lines far apart mean gentle ground. Count the lines a stretch of trail crosses and multiply by the interval to get the climb.
- Lines that bend into a V where they cross a stream point upstream, and closed rings mark a peak.
- Before you go, pick a handrail (a stream or ridge beside the route) and a backstop (a road or lake you’d hit if you went too far).
How to Read a Topographic Map, Starting in the Margin
Start with the small print around the edge of the map, not the lines in the middle. The margin gives you the scale, so you can measure distance, and the contour interval, so you can turn lines into height. Without those two numbers, the lines can’t tell you much.
If you unfolded the map and went straight for the squiggles in the middle, that’s why it looked like a fingerprint. Those lines follow rules printed at the edge, and I’d read the margin before I’d look at a single line.
A contour line joins points of the same height above a zero level, such as mean sea level. You won’t find it on the ground: it’s a way of drawing height on flat paper. The contour interval is the difference in height between one line and the next.
Here’s what to look for at the edge, and why each one matters:
- The bar scale, which turns a length on the map into distance on the ground. You’ll use it to check how far your turn or the next water is.
- The contour interval, the height step between lines. Every climb you work out later is a count of lines multiplied by this number.
- The colors on a US Geological Survey (USGS) topographic map, as its topographic map symbols booklet lists them: brown contours, blue water, green vegetation, red for important roads, and black for other roads, trails and boundaries. Knowing them lets you tell a stream from a trail at a glance.
- The colors on a Natural Resources Canada (NRCan) map: black for cultural features and names, blue for water, and green for woods, with clearings left white. That green-and-white pattern shows where the trees open up.
- Index contours, the heavier lines labeled with their elevation, and the thin intermediate contours drawn between them at the interval. The labels are how you know the actual height of any line.
The full key isn’t always on the front. On an NRCan map, the symbol legend is printed on the back of each sheet in the National Topographic System (NTS), as NRCan’s tips for topographic maps point out. USGS publishes its symbols separately, in the US Topo Map Symbol Guide.
The examples through this guide use a USGS 1:24,000 map and an NRCan 1:50,000 map, the scale NRCan calls the most used in Canada. Here’s where each one keeps the things you’ll look for first.
What to Find
USGS 1:24,000 (US)
NRCan 1:50,000 (Canada)
Scale on the ground
1 inch = 2,000 feet, about 2.6 inches per mile
2 cm = 1 km, 1 cm = half a kilometer
Contour interval
Printed below the bar scale
In the margin notes
Contour units
Usually feet
Meters or feet
Symbol legend
In the US Topo Map Symbol Guide
On the back of each NTS map
Scale on the ground
USGS 1:24,000 (US): 1 inch = 2,000 feet, about 2.6 inches per mile
NRCan 1:50,000 (Canada): 2 cm = 1 km, 1 cm = half a kilometer
Contour interval
USGS 1:24,000 (US): Printed below the bar scale
NRCan 1:50,000 (Canada): In the margin notes
Contour units
USGS 1:24,000 (US): Usually feet
NRCan 1:50,000 (Canada): Meters or feet
Symbol legend
USGS 1:24,000 (US): In the US Topo Map Symbol Guide
NRCan 1:50,000 (Canada): On the back of each NTS map
If your map comes from another country’s mapping agency, look for the same three things in its margin or legend (the scale, the contour interval and the symbol key) before you count a single line.
Quick Tip: Find the contour interval before you trace your route, because every height you work out later depends on it. On a USGS map it’s printed below the bar scale, and on an NRCan map it’s in the margin notes.
If you’re in the US and want to follow along, USGS explains how to find and download topographic maps for free, so you can pull up the map for a trail you already know.
Why the Contour Interval Isn’t the Same on Every Map
There’s no standard contour interval: USGS sets it per map, 10 feet or less in flat country and 100 feet or more in mountains. Canadian maps may show contours in meters or feet, so the same spacing can mean gentle ground on one map and steep ground on another.
If you learned contours from one hiking map, it’s easy to carry its interval around as if it were fixed. The next map may use a very different one, and nothing about the lines themselves will warn you.
The same goes for the heavier index lines. USGS draws one every fourth or fifth contour, depending on the interval, so “every fifth line” isn’t a rule you can count on. Read the labels instead.
What does stay put is where the interval is printed. The US Topo Map Symbol Guide says it’s always noted below the bar scale in the map margin, and on an NRCan map it sits in the margin notes.
That’s why counting lines without checking the interval gives you a number that means nothing. Ten seconds with the margin turns the same count into a real height.
How to Tell How Steep the Trail Gets From Contour Spacing
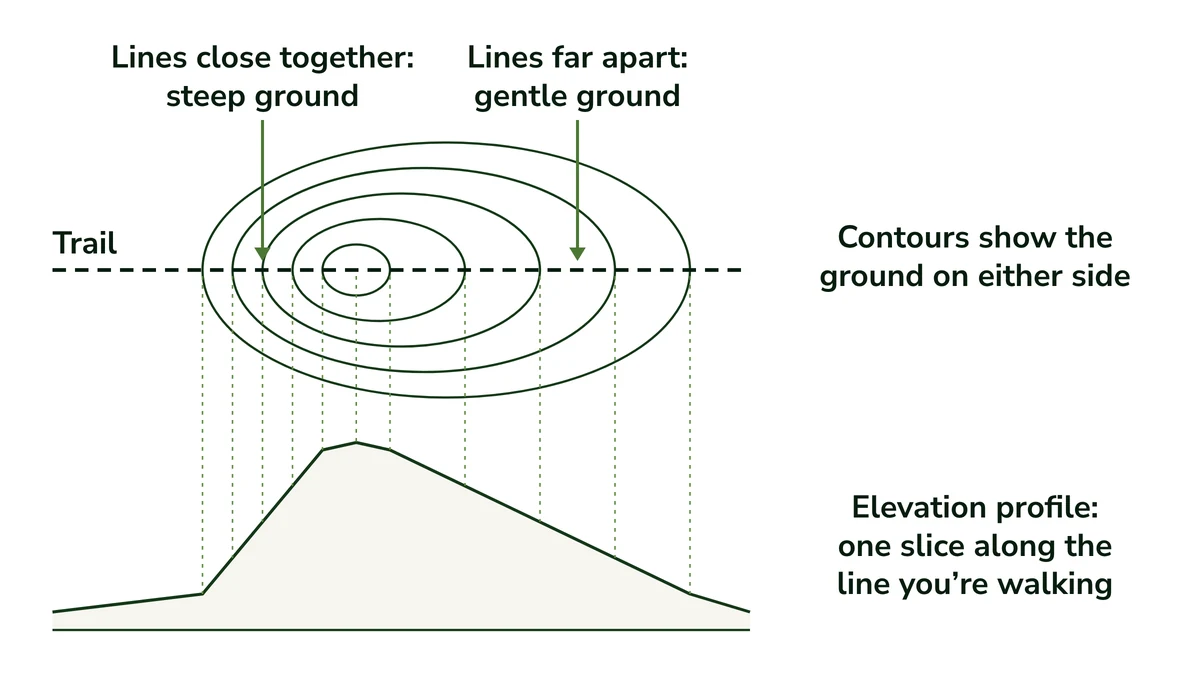
Lines close together mean steep ground, and lines far apart mean gentle or flat ground, because on a steep slope the same rise in height fits into less distance. To get the climb, count the contour lines a stretch of trail crosses and multiply by the interval in your margin.
Think of each line as a step of the same height. On a steep slope you reach the next step after a short walk, so the lines crowd together. On a gentle slope you walk a long way before you gain that height, so they spread out.
Each contour line keeps one height all the way along, which is why, as USGS’s topographic map symbols booklet notes, contour lines never cross. On a single slope, stepping from one line to the next always gains or loses one interval, so the spacing reads as steepness.
Here’s the kitchen-table version. Follow tomorrow’s route with your finger and count the lines it crosses on the way up. Multiply by the interval: six lines is about 60 feet of climbing at a 10-foot interval, and about 600 feet at a 100-foot interval.
If the trail climbs, dips and climbs again, count each climb separately. A line crossed going down takes height away rather than adding it.
When you’re scanning tomorrow’s route for the hard part, look for the stretch where the lines crowd together across the trail. That’s where the climb bites, and it’s the stretch I’d plan a rest around rather than discover halfway up.
What Contours Show That Your App’s Elevation Profile Doesn’t
An elevation profile is one slice along the line you’re walking. Contours show the ground on either side: where the slope steepens around the trail, and which way is downhill if you step off it. The profile tells you the climb, and the map shows the ground around you.
The obvious question is why you’d bother with contours when your app already draws a profile. The profile is good at its job: it shows how much you’ll climb, where along the route, and how steep each stretch of the line is.
What it can’t show is anything off the line. A trail can run across a gentle shelf with ground falling away steeply on one side, and the profile looks just like a shelf with an easy slope on both sides.
On the map, that drop shows up as lines bunched tight on one side, and you can see where the ground steepens beside and ahead of the trail. So I don’t see it as app against map: the two answer different questions, and they work together.
Ridges, Valleys, Saddles and Peaks: Reading the Shapes the Lines Draw
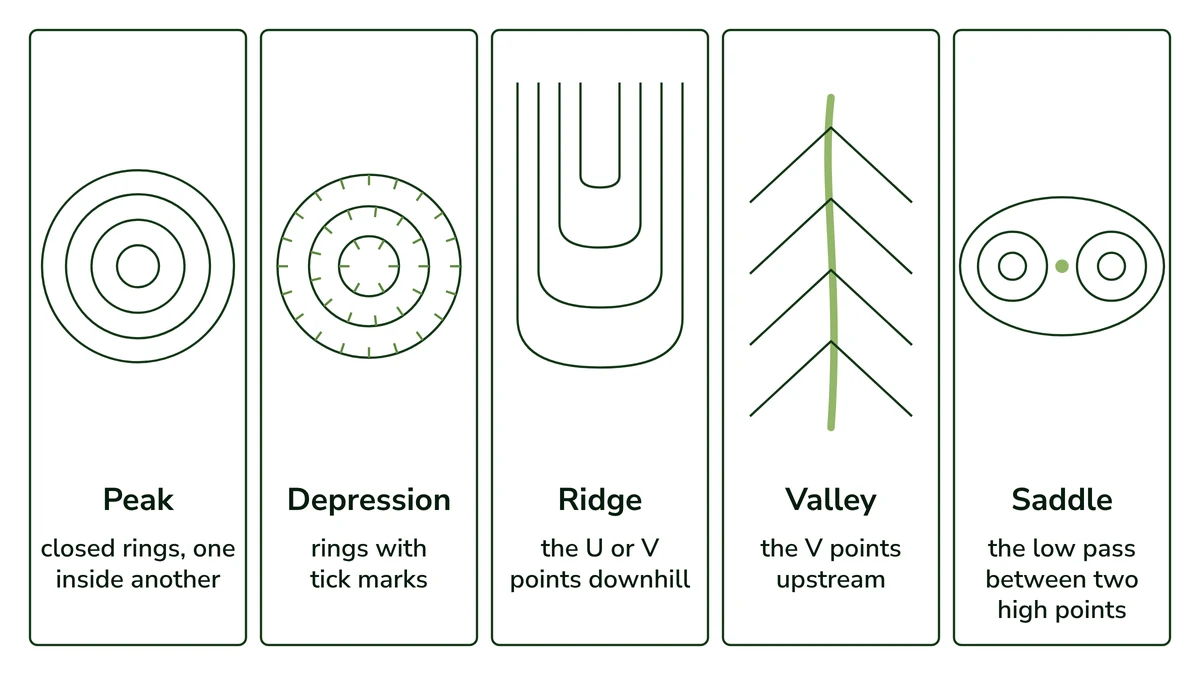
Where contour lines cross a stream, they bend into a V that points upstream. Closed rings mark a hilltop or peak, and rings with tick marks mark a dip. A ridge is a long, narrow rise, and a saddle is the low pass along it between two high points.
This is where the fingerprint starts to make sense. A tight swirl of closed rings with no tick marks is a summit, and the V’s pointing back up toward it are valleys. Once you can name the shapes, the lines stop being noise.
The shapes worth knowing:
- Peak or hilltop: closed rings, one inside another, with the highest ring in the middle. The label on the index line tells you how high it gets.
- Depression: closed rings carrying small tick marks, which USGS draws pointing toward the lower ground. Without the ticks it would read as a hill, so they’re worth a second look.
- Ridge: a long, narrow rise. Its contours bend into a U or V that points downhill, away from the high ground, the opposite of a valley’s V. A trail that follows one stays high, with ground dropping on both sides.
- Saddle: a dip or pass in a ridgeline between two higher points. On the map, it’s the low gap between two sets of closed rings, shaped much like a saddle on a horse.
- Valley: lines bend into a V where they cross a stream, with the point of the V upstream. It’s the shape that tells you most at once.
The V has a simple reason behind it. A contour line stays at one height, and a valley floor is lower than the slopes beside it. So the line has to run up the valley until the floor rises to its height before it can cross the water.
That detour is the V, and because water runs downhill, its point shows you the high end of the valley. A valley doesn’t need a creek to show this shape, either. A dry valley bends the lines the same way, so look for the shape, not only the blue line.
If you learn one shape first, I’d make it the V. It tells you there’s a valley, which way it runs and which way is downhill, all from one bend in a line.
Quick Tip: To tell uphill from downhill, compare two labeled index lines: the higher number is uphill. On an NRCan map, the contour numbers are also printed so they read uphill.
How to Measure Distance on the Map With the Scale Bar
Use the scale bar: on a USGS 1:24,000 map, 1 inch is 2,000 feet on the ground, about 2.6 inches per mile, and on an NRCan 1:50,000 map, 2 centimeters is 1 kilometer. Trails bend, so lay a string along the route, then straighten it against the bar.
The bar works because the map is drawn to a fixed ratio. At 1:24,000, one unit on the paper is 24,000 of the same units on the ground, so any length you measure converts straight to a distance.
That’s the scale of the USGS 7.5-minute maps covering the lower 48 states and Hawaii. Each sheet covers 7.5 minutes of latitude by 7.5 minutes of longitude, as the US Topo Map Symbol Guide explains.
A mile is 5,280 feet, so at 2,000 feet to the inch it comes to 2.64 inches on the map. Alaska’s 7.5-minute maps are 1:25,000, so check the ratio printed on yours.
On an NRCan 1:50,000 map, 2 cm is 1 km on the ground, so each centimeter is half a kilometer. The scale bar at the bottom has a smaller section on the left for fractions of a kilometer, which helps with short stretches like the walk to a lake.
For a trail that bends, measure it like this:
- Lay a piece of string along the route on the map, following each bend from your start to the point you care about.
- Pinch the string where that stretch ends, then straighten it along the scale bar.
- Read the distance off the bar. If the string runs longer than the bar, mark the bar’s length on the string and measure it in sections.
On straight stretches, a compass’s baseplate ruler does the job faster, so if you’re shopping for one, it’s worth picking a compass with a ruler that suits your map.
Either way, treat the number as a rough hiking distance. The string can’t follow every small switchback, so the walk itself can run a little longer than what you measure.
A trail sign or listing usually gives you one number, the total. I’d measure the stretches that matter on the day instead: trailhead to your turn, your turn to water, water to the lake. Those are the distances that tell you when to expect each one.
Matching the Map to the Trail With Handrails and Backstops
A handrail is a long feature beside your route, like a stream, ridge or lakeshore, that stays in sight or sound. A backstop is something you’d hit if you went too far, like a road or a lake. Together they tell you you’re on track or past your turn.
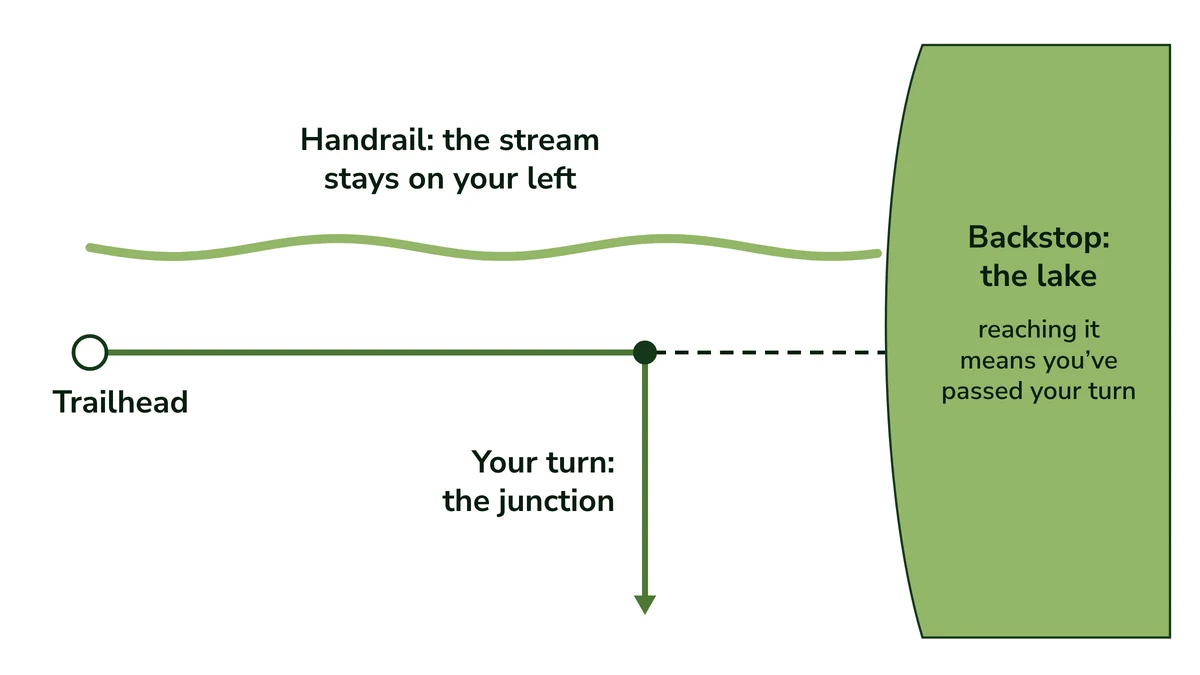
This is where the map earns its place in your pack. If the stream the map shows beside your route is still there, and still within earshot, you’re on track without any dot on a screen. That holds on a marked day hike as much as off trail.
Say your route follows a stream on your left, then turns right at a junction. If the stream drifts away and goes quiet before the junction, you’ve probably left your trail. If you reach the lake the map shows beyond the junction, you’ve walked past your turn.
I’d choose the clearest features, not the most. One handrail you can’t miss and one backstop you can’t walk past are worth more than five small landmarks you’d have to hunt for.
Quick Tip: Before your hike, trace the route on the map and name one handrail and one backstop for it, so you know what you should see along the way and what would tell you you’ve gone too far.
Pick a Handrail and a Backstop Before You Leave
Good handrails are long and hard to miss. The Mountaineers’ guide to wilderness navigation describes them as linear features that run parallel to your direction of travel, within frequent sight or sound: rivers, ridges, valleys, lakeshores, roads and fences all count.
A backstop works the other way. It’s a long, unmistakable feature that runs across your direction of travel, such as a big lake, a road or a river, so reaching it tells you you’ve gone far enough, or past your turn.
The Mountaineers also describe a baseline (or catch line): a long feature that always lies in the same direction from you, which you can head for if you lose the route.
NOLS, the wilderness school, recommends looking for handrails and backstops to confirm you’re following your route, and doing your map checks where visibility is good. A clear view makes it much easier to match a ridge on the map to the one in front of you.
Turning the map so it lines up with the ground, and allowing for declination (the angle between true north on your map and magnetic north on your compass), are the compass side of this, covered in how to use a compass with your map.
And if your backstop says you’ve walked past your turn, the next steps are in what to do if you get lost.
Can a Paper Map Back Up Your Phone?
It can, once you’ve practiced at home, and it works best with a compass beside it. A paper map needs no battery, but it has no dot showing where you are: a handrail you can see and a backstop you’d reach narrow your position to a short stretch of trail.
The Mountaineers list map and compass together under navigation in their Ten Essentials, because carrying more than one tool gives you a backup when one fails.
The moment it matters is usually an ordinary one. The offline map you downloaded doesn’t load, or the battery is lower than you planned, and you’d like to know you’re still on the right trail.
A common worry is that a paper map can’t show where you are. There’s no dot, but if the stream is still on your left and you haven’t reached the lake past your junction, you’re on the short stretch between them. Pinning the exact spot is compass work.
The tradeoff is time: an hour or two of practice at home with a map of a trail you already know, against a backup that needs no battery. To me that’s a fair trade, because the learning happens at the kitchen table, not on the trail when you need it.
There’s one honest limit. USGS says recreational trails are a problem on US Topo maps because there’s no national data source for them, though more are added each year. The National Park Service says some of its hiking trail data comes from sources that weren’t surveyed or field-checked.
So carry the land manager’s trail map along with the topo, or check one against the other before you go. If you want a downloadable topographic map that includes trails, USGS names US Topo and topoBuilder as the best options.
Whether the map is worth the space is your call. In the pack, it’s one item among a few, next to the phone, the power bank and a compass, and the day hike essentials show where it fits.
Pick the next route you plan to hike, open its map, and answer three questions at the table: where does it climb hardest, which side drops away, and what would you hit if you walked past your turn?
Founder & Gear Research Editor

Sonia Zannoni
I’m Sonia, the founder of Best Trail Backpacks. I don’t test gear myself. For every pack I cover, I read the manufacturer’s specs and sizing charts and look for what owners report again and again.
Fit comes first, because a pack that doesn’t match your torso and hips will hurt no matter what it cost. My goal is to help you choose a pack that suits your body, your trip and your budget.
About the Founder
