
Camping Coffee: How to Make a Good Cup at Camp and Keep It Hot
It’s the night before the trip and you’re standing over the camp box, deciding which coffee things come along. Tomorrow’s first cup is already playing out in your head: thin and bitter, or good but paid for with a heavy kit and a pot of wet grounds.
That back-and-forth is normal. Most camp coffee advice is a long list of gadgets, so it’s hard to tell which fits a car campsite and which belongs on a first overnight. And wanting a decent cup outdoors isn’t fussy.
You want camping coffee that’s worth drinking, made with the gear your kind of trip allows, plus a way to keep the second cup hot.
By the end you’ll know which method to pack for your next trip, the few numbers that make it taste right, and a simple routine for keeping it hot while you pack up camp.
TL;DR: Camping Coffee
- Pick the method by how you camp: instant or a pour-over cone when everything rides on your back, a press or percolator when the car carries the weight and you’re brewing for several.
- Each step up from instant buys flavor with more gear, more stove time and more wet grounds to carry home.
- At sea level, use water just off the boil; up high, boiling water is already close to the brewing range.
- Pack out grounds and filters, and preheat your insulated bottle with hot water before you fill it.
What Each Way of Brewing Costs You at Camp
Every camp brewing method trades the same four things: how the coffee tastes, how much gear you carry, how long the stove runs, and what you carry home wet. A better-tasting method almost always asks for more of the other three, so the right one depends on how you camp.
Here’s what I weigh for each method before deciding anything:
- Taste. What each step up actually adds to the cup, because that’s what you’re paying for in weight and fuss.
- Gear to carry, and whether any of it is glass. A glass press can’t go on a stove and needs a flat, steady surface, which a picnic table has and a rock often doesn’t.
- Stove time and fuel. Every extra minute of boiling or perking burns fuel you may want later for dinner or tomorrow’s breakfast.
- Cleanup and what goes home wet. Spent grounds get packed out, and a soggy clump of them is heavier and messier than an empty packet.
- One cup or several. A method that’s quick for one person can turn into a slow line when four people want coffee.
- Car or back. When the car carries the gear, bulk barely matters. When it all rides on your back, every piece earns its place or stays home.
Line the methods up against those and a pattern shows. Better coffee usually means more gear, more stove time and fuel, and more wet waste to carry out, and the extra stove time matters most when fuel is limited.
That’s also where the usual complaint about instant comes in. Campers are split on it: some find even the pricier packets flat or burnt-tasting, while others are perfectly happy drinking it on the trail.
Arguing taste doesn’t get you very far, though. The more useful question is what each step up adds to the cup, and what it costs you in gear and cleanup to get it.
If I were choosing, I’d decide by the trip first and the taste second. A method you can’t carry comfortably, or don’t want to clean up after, won’t feel like an upgrade on a cold morning.
The Main Camping Coffee Methods, From Instant to Percolator
There are five main ways to make camping coffee: instant, cowboy coffee, pour-over, a French press and a percolator. In that order, they run from the least gear and cleanup to the most. Instant needs a mug; a percolator brings a pot, more stove time and wet grounds.
Where a maker publishes instructions, the steps below follow them. Cowboy coffee and pour-over have no single maker’s method behind them, so their steps stay general.
Instant (and Coffee Bags)
Instant is the lightest and simplest way to get coffee at camp: hot water, a mug and a packet. Follow the packet’s own water amount, because that’s the strength the coffee was made for, and extra water only thins it.
Cleanup is the easiest of all five, since nothing wet goes home, only the empty packets. That’s why some backpackers who are tired of carrying out soggy grounds switch to instant, or to coffee bags.
Taste is where opinions split, as above. I’d pack instant for any trip where weight and cleanup matter more than the cup itself, and for anyone who wants coffee in hand while the stove’s still cooling.
Cowboy Coffee
Cowboy coffee is grounds straight into a pot of water, with no filter at all. Bring the water to a boil, take the pot off the heat, stir in the grounds, let them settle, then pour slowly so most of them stay behind.
What you gain over instant is the taste of real ground coffee. What you give up is a clean cup, because the grounds stay loose in the pot and some always reach your mug.
You only carry the pot, but cleanup is the wettest of the light methods: a layer of soaked grounds sits in the bottom afterward. I’d call it the fallback for anyone who has a pot and coffee and nothing else.
Pour-Over
A pour-over is a small dripper or cone that sits on your mug, with a filter inside. You put the grounds in the filter and pour hot water through slowly, so the coffee drips into the mug and the grounds stay in the filter.
Grind advice differs from one dripper to the next, so follow your dripper’s own instructions on grind, and use the water and ratio basics further down. Compared with cowboy coffee, the filter gives you a cup without the grit.
It’s light and quick for one or two people. What goes home is a used paper filter with its grounds, or wet grounds knocked out of a reusable filter. For a first overnight where you still want real coffee, this is the one I’d look at first.
French Press
A French press steeps the grounds in the water, then a mesh filter pushes them to the bottom. Bodum’s press instructions call for coarse ground coffee only, because a fine grind can clog the filter and build pressure, and about one rounded tablespoon per 4 oz cup.
Pour hot water, not boiling, and leave about 1 inch of space at the top. Let it brew at least 4 minutes, then press slowly, since pushing hard can make scalding coffee shoot out.
A glass press never goes on the stove. It needs a flat, heat-proof, non-slip surface, and a chipped or cracked one shouldn’t be used at all.
Over pour-over, a press makes several cups in one go with no paper filters to carry. The cost is bulk, plus the wet grounds packed into the bottom, and scooping those out is the messy job that sends some backpackers back to instant.
I’d bring a press when the car carries it and two or three people want coffee at the same time.
Percolator
A percolator pushes boiling water up a tube and over a basket of grounds, again and again, until the coffee is ready.
One percolator maker’s guidance is a coarse grind, about 1 tablespoon per 5 to 6 oz of water (its “cup” is smaller than most mugs), and a gentle perk of about 3 to 5 minutes rather than a hard boil, since going much past 6 minutes turns it bitter.
Another maker’s own warning: don’t overfill it. It’s the most gear and the longest stove time of the five, but it brews for a whole group in one pot.
Afterward there’s a basket of wet grounds to empty into your bag. This is the one I’d pick for a car campsite with a crowd who all want a second cup.
Which Method Fits Your Trip: Car Camping or Backpacking, Solo or Group
Match the method to the trip, not to a ranking. When the car carries the weight and you’re making coffee for several people, a press or percolator earns its bulk. When everything rides on your back, instant or a light pour-over cone usually wins on weight and cleanup alone.
Two questions settle most of it: does the car or your back carry the gear, and are you brewing for one or for several? Here’s how the five methods compare on what you carry, how long the stove runs and what you take home.
Method
Best For
Gear to Carry
Stove Time
What Goes Home Wet
Instant
Backpacking and solo trips
A mug and packets
Only boiling water
Packet trash only
Cowboy coffee
Anyone with just a pot
A pot
Boil, then settle
Loose grounds in the pot
Pour-over
One or two people, backpacking or car
A dripper and filters
Boiling water only
A filter with grounds, or grounds from a reusable filter
French press
Car camping, small groups
The press, bulkier; glass stays off the stove
Boil, then steep at least 4 minutes
Grounds packed in the press
Percolator
Car camping, groups
The pot, the heaviest kit
The longest, a gentle perk of a few minutes
A basket of grounds
Instant
Best For: Backpacking and solo trips
Gear to Carry: A mug and packets
Stove Time: Only boiling water
What Goes Home Wet: Packet trash only
Cowboy coffee
Best For: Anyone with just a pot
Gear to Carry: A pot
Stove Time: Boil, then settle
What Goes Home Wet: Loose grounds in the pot
Pour-over
Best For: One or two people, backpacking or car
Gear to Carry: A dripper and filters
Stove Time: Boiling water only
What Goes Home Wet: A filter with grounds, or grounds from a reusable filter
French press
Best For: Car camping, small groups
Gear to Carry: The press, bulkier; glass stays off the stove
Stove Time: Boil, then steep at least 4 minutes
What Goes Home Wet: Grounds packed in the press
Percolator
Best For: Car camping, groups
Gear to Carry: The pot, the heaviest kit
Stove Time: The longest, a gentle perk of a few minutes
What Goes Home Wet: A basket of grounds
Car camping with a group is where a press or percolator makes sense. The weight sits in the trunk, the stove is right there, and one pot fills several mugs instead of everyone waiting their turn at a single cone.
Solo or backpacking flips it: the lighter methods win, and on a backpacking trip that’s a fair choice, not a lesser one.
If you’d still rather carry a heavier brewing kit on an overnight, weigh it against how heavy your pack should be overall. The coffee kit competes with your shelter, food and water for the same load.
If I were packing for a first overnight, I’d take a pour-over cone and a few filters, with a couple of instant packets tucked in for the morning I don’t feel like waiting. For a car campsite with friends, I’d take the percolator.
If you already know your method, skip ahead to the routine for keeping your second cup hot on a cold morning.
Why Boiling Water Isn’t the Target (Unless You Camp High)
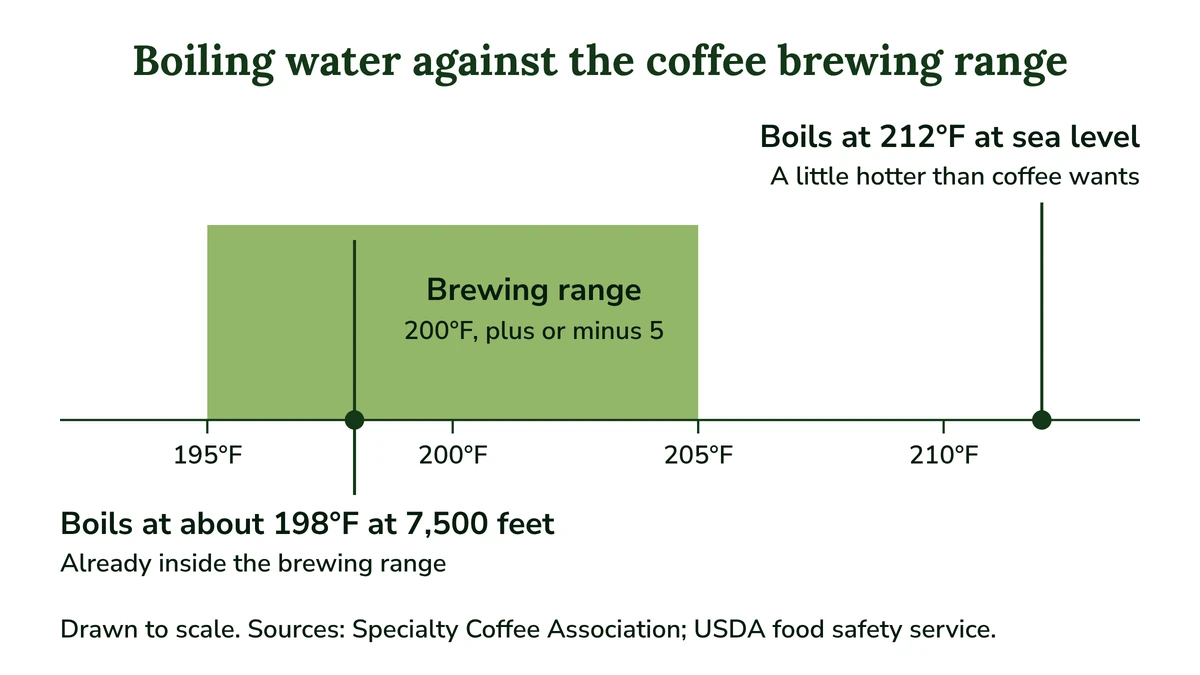
At sea level, water straight off a rolling boil is hotter than coffee brewing guidance calls for. The Specialty Coffee Association puts the target at about 200°F. Camp higher and the problem fades, because water boils lower as you climb: around 198°F at 7,500 feet.
The kettle’s roaring and the instinct is to pour the second it boils. It feels right, since hotter seems like it should mean stronger, but at sea level that water is a little hotter than coffee wants when it hits the grounds.
The SCA puts water at the point of contact with the coffee at 200°F, plus or minus 5 (about 93°C, plus or minus 3). Bodum’s press instructions say the same thing in plainer words: hot, not boiling.
Neither one gives a wait time, and you don’t need a thermometer: once the boil stops, a short pause before you pour is all “just off the boil” means.
Outdoors, there’s a twist. Water boils at 212°F at sea level, and USDA’s food safety service notes that each 500 feet of elevation lowers the boiling point by just under 1°F. At 7,500 feet, water boils at about 198°F.
Put those two sources side by side and the boil at 7,500 feet already lands inside the SCA’s range. That’s my own reading of the two together, not something either one says, but it means the higher you camp, the less “let it sit off the boil” matters.
How much this matters depends on the method. A press steeps for at least 4 minutes, so the water temperature has plenty of time to shape the cup. With instant stirred into a mug, I wouldn’t think twice: follow the packet and drink it.
For strength, the SCA’s ratio is 55 g of coffee per liter of water, plus or minus 10%. If you carry a small scale, that works out to about 20 g of coffee for a 12 oz mug.
The press and percolator makers measure by volume instead, about a tablespoon per small cup (4 oz for Bodum’s press, 5 to 6 oz for the percolator maker), so a 12 oz mug takes two to three. Use whichever matches the tools you’ve packed.
Grind follows the method. Go coarse for a press or a percolator, and for pour-over, use whatever grind your dripper’s instructions give.
Quick Tip: Up high, skip the wait. At about 7,500 feet, water boils at around 198°F, which is already inside the brewing range.
How to Pack Out Coffee Grounds (and Why Burying Them Isn’t the Answer)
Spent coffee grounds are leftover food, and Leave No Trace asks campers to pack out leftover food and kitchen waste. Some parks also say not to bury organic items. So bag the grounds and filters and carry them home, unless the land manager where you camp says otherwise.
Breakfast is done, the mugs are rinsed, and there’s a wet clump of grounds in the press or the pot. It’s messy, it’s heavier than it looks, and tipping it into the bushes is tempting.
The usual reasoning is that grounds are natural and break down, so scattering or burying them is fine. Leave No Trace’s principle on disposing of waste properly asks you to pack out leftover food and kitchen waste, and spent grounds are both.
The same principle asks you to strain dishwater and carry out what the strainer catches. Great Smoky Mountains National Park’s backcountry guidance goes further: it says not to bury any trash, including organic items.
Rules do differ from place to place. At least one state park’s backcountry rules tell campers to bury soft food scraps such as coffee grounds, so pack grounds out by default, and follow the land manager’s rule where one exists.
If this is new to you, the Leave No Trace basics cover the rest of what to carry home and why, without any finger-wagging.
In practice that means one zip bag kept just for grounds and paper filters. It also ties back to the tradeoff from the start, because the methods that leave less wet waste are lighter to carry home, too.
It’s a small bag for a small job, and it leaves the campsite the way you found it.
Quick Tip: Keep one zip bag just for grounds and filters, and strain your dishwater so what the strainer catches goes into the same bag.
How to Keep Your Second Cup Hot on a Cold Morning
Preheat the bottle before the coffee goes in. Thermos’s care guide says to fill it with hot water, put the lid on, wait 5 to 10 minutes and empty it, then fill it with coffee right away, leave room for the stopper and close it again.
The reason is simple: a cold steel wall pulls heat out of the first coffee poured in. Warm the wall first and the coffee keeps that heat for itself.
It’s cold, you’re still half in your sleeping bag, and getting up to brew a second round is the last thing you want. That’s exactly what a bottle filled at the first brew is for. Here’s the routine, step by step:
- Fill the bottle with hot water, as your bottle’s instructions say, not boiling. This warms the steel before any coffee touches it.
- Put the lid on and let it stand 5 to 10 minutes. The lid keeps the heat in while the inside warms through.
- Empty the water. Do it just before the coffee is ready, so the bottle doesn’t cool down again while it waits.
- Fill it with coffee right away, leaving room for the stopper. An overfilled bottle can overflow when you close it, and hot coffee can scald.
- Close the lid again straight after filling. An open bottle keeps losing heat, so recapping matters as much as preheating.
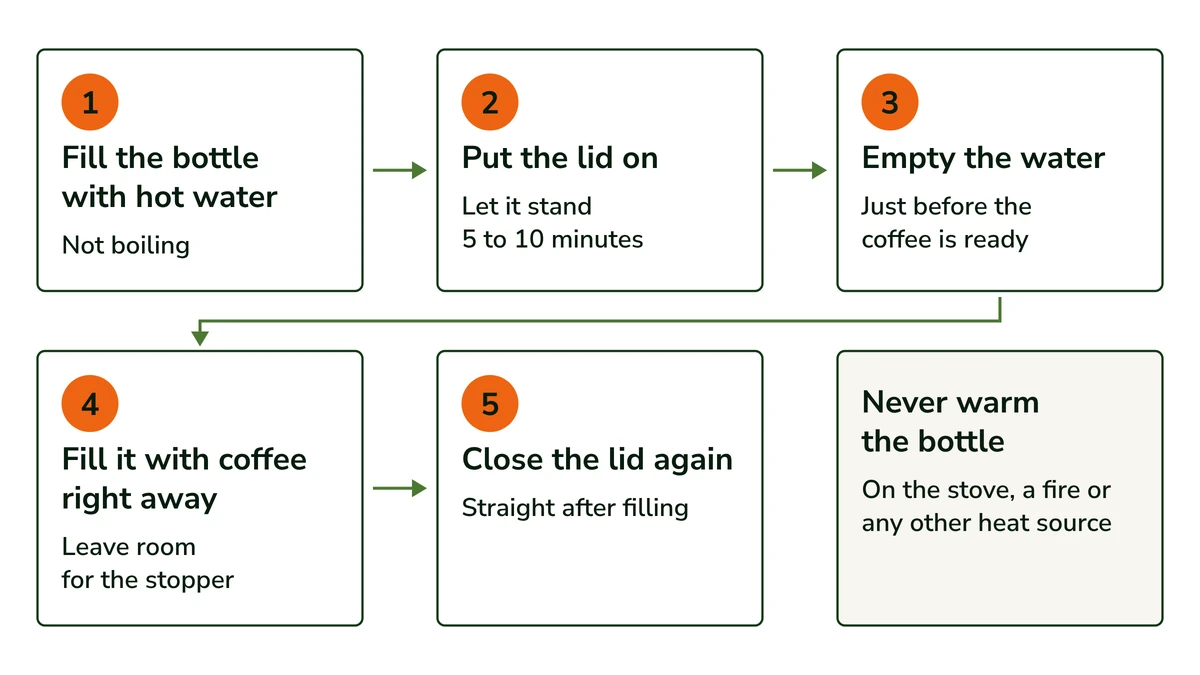
Never warm the bottle on the stove, a fire or any other heat source. Thermos’s guide rules that out, along with the microwave and the oven, and hot water inside the bottle does the job anyway.
Makers list hold times for their own bottles, and most don’t say how they measured them. At least one states its test: water starting at 203°F in a 68°F room, kinder than a cold morning outside. So the number on the box tells you less than it seems to.
One owner of a bottle sold as keeping coffee hot all day says theirs went lukewarm within a few hours. One report isn’t a pattern, but it’s a good reason to check your own bottle’s stated figure and treat it as a best case.
Some campers fill a bottle the night before so there’s something hot at dawn. That’s your call, and whether it’s still hot by morning depends on the bottle and the hold time its maker states.
Either way, heat the water outside. The CDC warns never to use a camping stove inside a tent, because of carbon monoxide, and I’d keep it out of the vestibule too. It’s the same stove the plan for one-burner camp meals uses for the rest of the day.
On a backpacking trip, the bottle itself is worth a thought, since vacuum-insulated steel weighs more than a plain water bottle. If you’re deciding whether it earns its place, here’s how insulated and plain bottles compare.
I’d trust the routine more than any number on the box. A warm bottle, filled to the right level and closed straight away, does more for that second cup than the label can promise.
Quick Tip: Start the preheat water while the coffee brews, so the bottle is warm and ready the moment the coffee is.
Pick the method your trip can carry, take the water just off the boil unless you’re camped high, and bring a bag for the grounds. Before you go, try the preheat routine once at home with your own bottle’s instructions, so it’s second nature on that first cold morning.
Founder & Gear Research Editor
Sonia Zannoni
I’m Sonia, the founder of Best Trail Backpacks. I don’t test gear myself. For every pack I cover, I read the manufacturer’s specs and sizing charts and look for what owners report again and again.
Fit comes first, because a pack that doesn’t match your torso and hips will hurt no matter what it cost. My goal is to help you choose a pack that suits your body, your trip and your budget.
About the Founder
