
How to Start Hiking: Choose a First Trail That Fits You and Plan the Day Around It
It’s a free Saturday, and the trail app shows three trails near you, all marked Easy. One is 2 miles and flat, one is 4 miles with a climb, and one has glowing reviews. You can’t tell which you’d actually finish, or how long it would take.
That isn’t a fitness problem or a lack of common sense. The Easy label belongs to one park’s or one app’s scale, a review tells you how the trail felt to the person who wrote it, and nobody starts out knowing what 1,000 feet of climbing feels like.
Most advice on how to start hiking begins with gear, but the trail is the real first step. The water, the shoes, the pack, what you wear and even the trail manners you’ll need all depend on the trail you pick, so if the trail is wrong, they’re wrong too.
By the end, you’ll be able to read any trail listing, work out whether you can finish it and how long your day will be, plan the day around that number, and know what to try next.
TL;DR: How to Start Hiking
- Start with the trail, and judge it by its distance (one way or round trip), its elevation gain and its expected time, not by its Easy label.
- Turn those numbers into time with a park’s own paces (Shenandoah National Park uses 1.5 mph for its easiest trails down to 1.2 mph for its strenuous ones), then add your stops and the climb back.
- For a first hike, pick a well-marked, reasonably busy out-and-back and a start time that leaves daylight to spare.
- After it, change one thing at a time: a little more distance or a little more climb, not both.
How to Start Hiking: Choose the Trail Before Anything Else
Choosing the trail comes first, because it sets how long the day runs, how much water you carry, what you wear and when you leave. Judge a trail by its distance, climb and expected time before its label, and pick one your whole group can finish.
Go back to those three Easy trails on the app. Before the photos or the star ratings, I’d read each one by its numbers, because the numbers are what your legs and your daylight will actually have to deal with.
Here’s what a first trail gets judged by, and why each one matters:
- Distance, and whether it’s one way or round trip, because a one-way figure on a trail that comes back the same way means you walk it twice.
- Elevation gain, the total climbing over the hike, because climbing is the part that slows you down and tires you out.
- Expected time, which on Parks Canada’s and Shenandoah’s pages means walking time in ideal conditions, so treat it as the shortest your day could be, not the likely length.
- Loop or out-and-back, because the shape decides how easy it is to turn around early.
- How well marked it is, because clear signs let you spend your attention on the walk instead of on finding the way.
- How busy it is, because other hikers nearby mean help isn’t far if you need it.
- Recent reports and closures, because a closed or damaged section changes the plan before you’ve left home.
- Parking, fees or permits, because each place sets its own, and finding out at the trailhead can cost you the morning.
- Whether the time plus your stops fits the daylight, because the whole plan depends on getting back before dark.
The National Park Service puts the starting point simply: pick a trail everyone in your group can complete and enjoy safely, and check the park’s website or ask a ranger about its difficulty.
The people who manage a trail can tell you what a one-word label leaves out. When I choose a trail myself, the park’s own website is what I use.
All of those checks come down to one question: can I finish this trail, and how long will my day be? The rest of this guide answers it, and the packing, the clothes and the trail manners each get a line once the trail is settled.
If you’re skimming, the one step worth doing before any first hike is the two-line difficulty check in the Shenandoah section below.
Four Things a Trail Listing Seems to Say but Doesn’t
A trail listing is easy to misread. Easy describes only one park’s or app’s scale, the biggest number may be the trail’s high point rather than your climb, and the distance may be one way.
The listed time can leave out your stops, too: Parks Canada’s assumes an average hiker in ideal conditions, and Shenandoah’s covers walking only.
None of these is a trick. Each listing is written in its own shorthand, and once you know what each number means, you can lean on the numbers and treat the label as a hint.
1. “Easy” Means the Same Thing Everywhere
It’s natural to read Easy as a promise about your day. It isn’t one, because each park and each app rates trails on its own scale, and the scales don’t match.
Shenandoah National Park works its rating out from distance and elevation gain, and Parks Canada writes its own definition for each level. AllTrails says on its help page that members rate a trail’s difficulty after hiking it, and that those ratings can differ from the trail’s listed rating.
In other words, difficulty labels aren’t shared between parks, or between a park and an app. That’s how a trail called Easy can still hold a long, steady climb: the climb was in the numbers all along, and the label came from someone else’s scale.
Reviews add one more layer. Each one tells you how the trail felt to the person who wrote it, so a trail that felt easy to them may not feel easy to you, especially on a first outing.
So if the app already rates a trail Easy, treat that as a starting point and then check the distance, the gain and the time.
I trust those three more than any label, because they’re measurements rather than someone’s opinion, once you know whether the distance is one way and what the time leaves out.
2. The Bigger Number Is How Much You Climb
A listing can show two elevation numbers. One may be the trail’s elevation, the height of its highest point above sea level, which is why it’s often the bigger number. The other is the elevation gain, which Parks Canada calls the climb: the total elevation you gain over the hike.
Only the gain is the work your legs do. A trail can top out high and still involve little climbing if it starts high too, so judge the effort by the gain, not the high point.
The small elevation profile on many listings can mislead you as well. Parks Canada notes that it shows relative change, not the actual slope, so a gentle trail can look steep.
If you want to see what the ground really does, it helps to read a topographic map. Its contour lines show steepness in a way the profile can’t.
3. The Listed Distance Is the Whole Walk
The distance on a listing looks like the length of your hike, but it may not be. Parks Canada’s guide to trail ratings says a listed distance may be one way, return or a loop, so check which one you’re reading.
That detail matters most on an out-and-back trail. If the 2 miles on the page are one way, you’ll walk 4, and every time estimate you make from that listing doubles with it.
4. The Listed Time Is How Long Your Day Will Take
The listed time feels like the most practical number on the page, and it’s the one most likely to run short. Parks Canada defines its duration as the time an average user with average abilities would take in ideal conditions.
Shenandoah says its own estimates cover walking only, not exploring or rest. So the photos, the snack on a rock, the stop to retie a boot and the slower pace of a first outing all come on top of it.
The next two sections turn a listing into your own number: first how hard the trail is, then how long your day will really take.
Check a Trail’s Difficulty Yourself With Shenandoah’s Formula
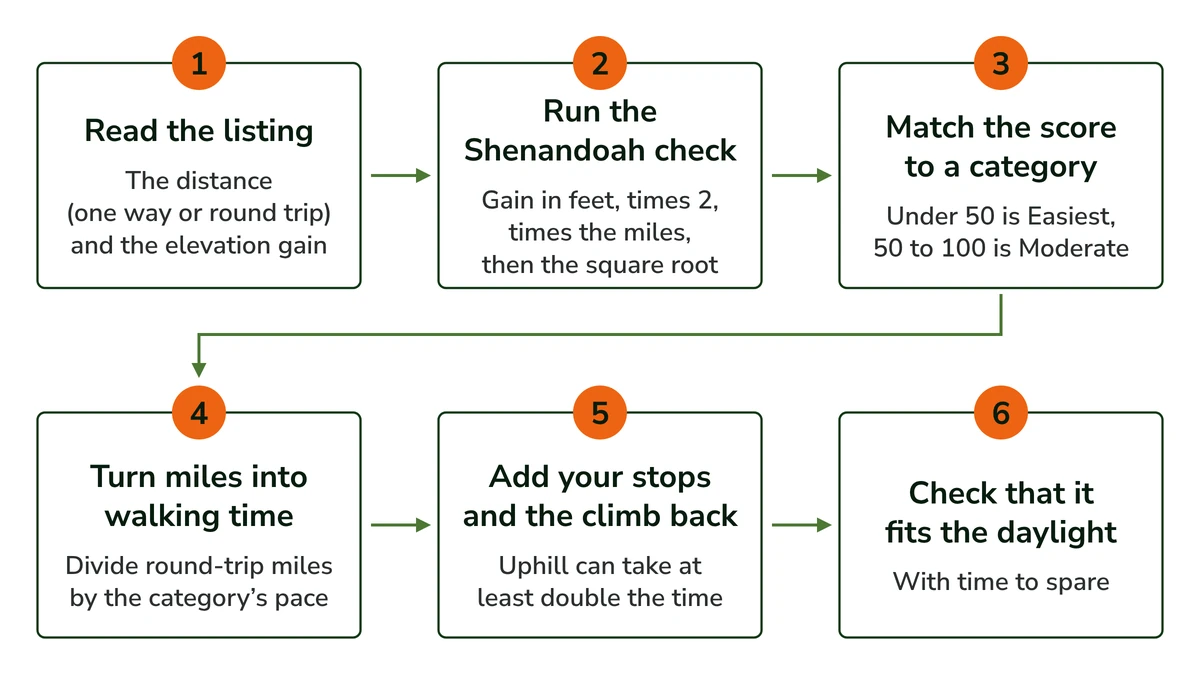
Shenandoah National Park rates its trails with a formula you can run on any listing: multiply the elevation gain in feet by 2, multiply that by the distance in miles, then take the square root. Under 50 is its Easiest category, and 50 to 100 is Moderate.
When that score and an app’s label disagree, I’d go with the score. It’s built from the two numbers that decide how hard your day will be, and the label isn’t.
The method comes from Shenandoah National Park’s page on how it determines hiking difficulty, which also lists the pace it uses for each category. The formula works in feet and miles, so convert a metric listing first: meters times 3.28 gives feet, and kilometers times 0.62 gives miles.
The climb counts as much as the distance in the formula: double the gain and the score rises just as much as if you doubled the miles. The park’s paces slow as its categories get harder, from 1.5 mph on its easiest trails to 1.2 mph on its strenuous ones.
Here are Shenandoah’s own categories, with the score, the typical distance and the pace the park uses for each.
Category
Rating (the square root score)
Typical distance in the park
Pace the park uses for time
Easiest
Under 50
Generally under 3 miles
1.5 mph
Moderate
50 to 100
Generally 3 to 5 miles
1.4 mph
Moderately Strenuous
100 to 150
Generally 5 to 8 miles
1.3 mph
Strenuous
150 to 200
Generally 7 to 10 miles
1.2 mph
Very Strenuous
Over 200
Generally 8 miles or more
1.2 mph
Easiest
Rating (the square root score): Under 50
Typical distance in the park: Generally under 3 miles
Pace the park uses for time: 1.5 mph
Moderate
Rating (the square root score): 50 to 100
Typical distance in the park: Generally 3 to 5 miles
Pace the park uses for time: 1.4 mph
Moderately Strenuous
Rating (the square root score): 100 to 150
Typical distance in the park: Generally 5 to 8 miles
Pace the park uses for time: 1.3 mph
Strenuous
Rating (the square root score): 150 to 200
Typical distance in the park: Generally 7 to 10 miles
Pace the park uses for time: 1.2 mph
Very Strenuous
Rating (the square root score): Over 200
Typical distance in the park: Generally 8 miles or more
Pace the park uses for time: 1.2 mph
Here’s how it works, with round numbers I’ve made up for the arithmetic rather than a real trail. Say the trail is 4 miles round trip with 1,000 feet of gain. That’s 1,000 times 2 times 4, which is 8,000, and the square root of 8,000 is about 89.
That puts the trail in Shenandoah’s Moderate band, even if an app calls it Easy. It’s worth knowing before you choose it, because it tells you the climb will be real work.
The formula isn’t perfect, and the park says so itself. It can rate a short, steep trail lower than it feels, because a small distance pulls the score down even when the climbing is hard. Shenandoah’s advice is to check the elevation and distance, not only the rating.
For a sense of what a first trail looks like on paper, the two agencies give their own ranges. Shenandoah says its Easiest trails are generally under 3 miles, and its Moderate trails generally run 3 to 5 miles and suit novice hikers who want a bit of a challenge.
Parks Canada’s Easy trails run 0 to 5 km (about 3.1 miles) and take no longer than 2 hours, with little or no elevation change and no experience needed. Neither range is a universal rule, but both agencies describe their easiest trails as short and mostly level.
Quick Tip: Run the check on your phone’s calculator before you choose: the gain in feet, times 2, times the miles, then the square root key. If the trail is short but the gain is big, treat the score as too low, as Shenandoah itself warns.
How Long Your First Hike Will Really Take
Divide the round-trip miles by the park’s pace, and you have walking time only: Shenandoah uses 1.5 mph for its easiest trails down to 1.2 mph for its strenuous ones.
Then add your stops, and plan for any climb on the way back to take at least double the time it took going down.
Turn Miles Into Walking Time
To turn a listing into time, divide the round-trip miles by Shenandoah’s pace for the trail’s category: 1.5 mph for Easiest, 1.4 for Moderate, 1.3 for Moderately Strenuous and 1.2 for Strenuous and Very Strenuous.
On the made-up trail from earlier, 4 miles at Moderate’s 1.4 mph comes to about 2 hours 50 minutes of walking, before you’ve stopped once. In a group, the estimate runs at the pace of the slowest walker.
The park is clear that these paces cover walking only, not exploring or rest, so plan extra time for breaks, photos and lunch. On a first hike I’d be generous with that extra, because you won’t yet know how often you like to stop.
Add the Way Back and the Climb
The National Park Service’s Hike Smart guidance makes two points that change the estimate. Your total time includes the walk back to the start, and any part of the trail that’s uphill can take at least double the time it took going down.
That catches out hikers on trails that descend first, down to a lake or a river, say. The easy part comes at the start and the climb waits for the end, when your legs are tired, so the return runs slower than the way out.
A hot day can stretch the walk too, so leave more room in the estimate when the forecast is warm.
Check That It Fits the Daylight
Now put the number against the clock. Your walking time, plus your stops, plus the slower climb back, should fit inside the daylight with time to spare. The NPS says to know when you set out and when you’ll turn around, so you aren’t caught in the dark.
The day to avoid is the one where you’re slow, tired and still a long way from the car as the light starts to go. An honest estimate made at home makes that much less likely, and I’d rather leave a wide margin than a neat one.
A few quick jobs round this out. Leave a trip plan with someone at home, and check the forecast and the sunset time for the day.
Then set a turnaround time and stick to it, which the NPS advises too. If you reach it before the end of the trail, you turn back, and the day still fits.
What the Time Tells You to Carry and Wear
The length of the day decides how much water and food goes in the pack, which is the real reason the trail comes before the packing. With your estimate in hand, here’s what to pack for a day hike, kept to the short list a first outing needs.
If you still need something to carry it in, my guide to the best daypack for beginners compares three beginner picks.
A longer day or an exposed trail also changes the weather you’re dressing for, since you’ll be out through more of the day’s changes. The simple answer is to dress in layers you can add or take off as you go.
Shape the Day: Out-and-Back or Loop, and How Busy a Trail Should Be
For a first hike, a well-marked, reasonably busy out-and-back is the forgiving choice: you can turn around anywhere and walk back on ground you’ve already seen, with other hikers nearby.
A quieter or more scenic trail gives you calm and views, but fewer people around and often more navigation. Check closures, parking, fees and permits before you leave.
Out-and-Back or Loop
An out-and-back trail goes to a point and returns the same way. That shape lets you turn around wherever you like and walk back on ground you’ve just seen, while a loop commits you to finishing it or to retracing everything you’ve walked so far.
That’s my reasoning rather than a rule, but it fits the American Hiking Society’s point that you can always turn around if a trail feels too hard. On an out-and-back, turning around is built into the shape of the walk.
It also takes the sting out of turning back. On a first hike, heading back early isn’t failing the trail, it’s the plan doing its job.
Plenty of park trails work this way. Great Smoky Mountains National Park, for one, notes that most of its trails are out-and-back, with very few loops.
Busy Enough and Clearly Marked
The American Hiking Society’s beginner guide advises choosing trails that are well maintained and clearly marked until you feel comfortable navigating. A trail that’s easy to follow leaves you free to watch your pace and your time, which is what a first hike is really teaching you.
Here’s the real tradeoff between the two kinds of trail:
- A shorter, busier, well-marked trail puts help nearby and makes turning around easy, but it’s less quiet, and parking can be harder to find.
- A quieter or more scenic trail gives you calm and views, but there are fewer people around if something goes wrong, and it often asks more of your navigation.
For a first hike, I’d take the busier one. The quiet trail will still be there once you know your own pace, and by then you’ll enjoy it more.
A popular trail does mean sharing it, with people passing, stopping and coming the other way, so it helps to know a little trail etiquette before you go.
And if you’re planning a first solo hike, choosing the trail comes with a few extra checks of its own.
Read the Listing’s Small Print Before You Go
The last checks happen close to the day itself. The NPS says to check park alerts for trail closures, and Parks Canada says to weigh the current weather and trail conditions as well as the rating, so read the most recent reports on the listing too.
Parking, shuttles, fees and permits vary, because each land manager (the park, forest or agency that runs the trail) sets its own. Check that land manager’s page before you leave, including whether you need a permit, which the American Hiking Society also reminds beginners to check.
After Your First Hike: Step Up One Change at a Time
Once your first trail goes well, change one thing for the next one: a little more distance or a little more climb, not both. The agencies’ own ladders show the next rung, from Shenandoah’s Easiest to Moderate or Parks Canada’s Easy to Moderate.
None of the parks or hiking groups I read gives a fixed amount to add, so let your first hike set the pace.
A first hike that goes fine has a way of making the next idea much bigger: double the distance, a summit, the trail with the view everyone posts. I understand the pull, but I’d still change only one thing.
If you add both distance and climb and the hike feels hard, you won’t know which one did it. Change one, and the next hike tells you something clear about your own legs.
The ladders give you that next rung in plain numbers. On Shenandoah’s scale it’s the step from Easiest to Moderate, where trails generally run 3 to 5 miles.
In Parks Canada’s system it’s the step to Moderate: 0 to 15 km (about 9.3 miles), no longer than 5 hours, some basic trail experience, and moderate elevation change with short steep sections.
The American Hiking Society puts it simply: start small and work up, because that builds confidence. It also points out that 1,000 feet of gain may feel easy to one hiker and very hard to another, which is why your first hike is your best guide to your own pace.
Quick Tip: After each hike, write down how long it actually took next to your estimate. The gap shows your own pace against the park’s, and it makes your next estimate more accurate.
Pick the trail you’re leaning toward and write down its distance (one way or round trip), its gain and its expected time. Then run the Shenandoah check, add your stops and the climb back, and see whether the total fits your daylight with time to spare.
If it does, that’s your first hike.
Founder & Gear Research Editor
Sonia Zannoni
I’m Sonia, the founder of Best Trail Backpacks. I don’t test gear myself. For every pack I cover, I read the manufacturer’s specs and sizing charts and look for what owners report again and again.
Fit comes first, because a pack that doesn’t match your torso and hips will hurt no matter what it cost. My goal is to help you choose a pack that suits your body, your trip and your budget.
About the Founder
