
Hiking Alone as a Woman: A Practical Safety Plan for Your First Solo Hikes
Nobody you know is free this Saturday, so it’s go alone or stay home again. The advice pulls both ways: half says carry a knife and never let anyone know you’re alone, half says you’ll be fine, don’t overthink it.
Wanting a real plan isn’t paranoia, and it isn’t overthinking. Both kinds of advice skip the practical parts: which trail to start on, who should know where you are, what to say when a man asks if you’re alone, and what happens if you turn an ankle alone.
You want to know whether hiking alone as a woman is something you can do sensibly, and how to set up that first solo hike.
Here’s a calm, practical plan built on what park services actually advise, so you can tell whether a trail suits a first solo hike, set up the day, and know what to do if something goes wrong.
TL;DR: Hiking Alone as a Woman
- Start on a short, well-used trail you already know, with daylight to spare and a turnaround time you set before you leave.
- Give one person your plan and the exact time they should call for help if they haven’t heard from you.
- Strangers don’t need to know you’re alone or where you’re going. If someone makes you uneasy, say you’re with a group behind you, and trust your instincts.
- Alone, nobody can go for help, so take no extra risks on the day, and if you’re hurt, stay put.
Is Hiking Alone as a Woman Safe? What Park Services Actually Advise
Park services advise hiking with someone. The Forest Service says don’t hike alone, and the National Park Service says a companion is safer. If you go alone, the Park Service asks for extra preparation, because nobody will be beside you to help or to go for help.
The Forest Service is the bluntest about it: “Don’t hike alone.” AdventureSmart tells people to travel with a companion too. None of the agencies endorse going alone, and I won’t pretend they do.
What they do give is advice for when you go anyway. The NPS hiking safety advice asks anyone hiking alone to take extra measures to be prepared, since they’ll be traveling on their own.
On crime, the National Park Service calls the Appalachian Trail “safer than most places” but says it isn’t immune to criminal behavior, including violent crime. The Appalachian Trail Conservancy says much the same. That’s their view of that one trail, and neither gives a number, so I won’t either.
Behind a lot of the fearful advice is one idea: that a partner or a dog is what makes a hike safe, so without one you can’t be.
The Park Service’s guidance for the Appalachian Trail says a partner may add a measure of safety but shouldn’t lead to complacency. The Conservancy puts it plainly: you’re safest with a group, but neither a single partner nor a dog is a guarantee.
So the plan does the real work, with company or without it. I think that’s the part both kinds of advice get wrong: the fearful kind treats company as the safety, and the dismissive kind skips the plan altogether.
Nothing in this plan depends on carrying anything for protection: the park services’ advice is about planning, awareness and your exit options.
What changes when you’re alone is narrow but real: if you’re hurt, nobody is beside you to help or to walk out for help. Everything else in this guide is about shrinking the margin for error around that one fact.
Going with company is still a choice you’re free to make. If you’d rather have someone along, here’s how to find a hiking partner and meet someone new safely.
Choosing Your First Solo Trail: Short, Busy, Familiar, With Daylight to Spare
For a first solo hike, choose a trail you know, or a short one that gets plenty of foot traffic, so someone’s around if you need help. Leave early enough for daylight to spare, set your turnaround time before you go, and save new trails for later.
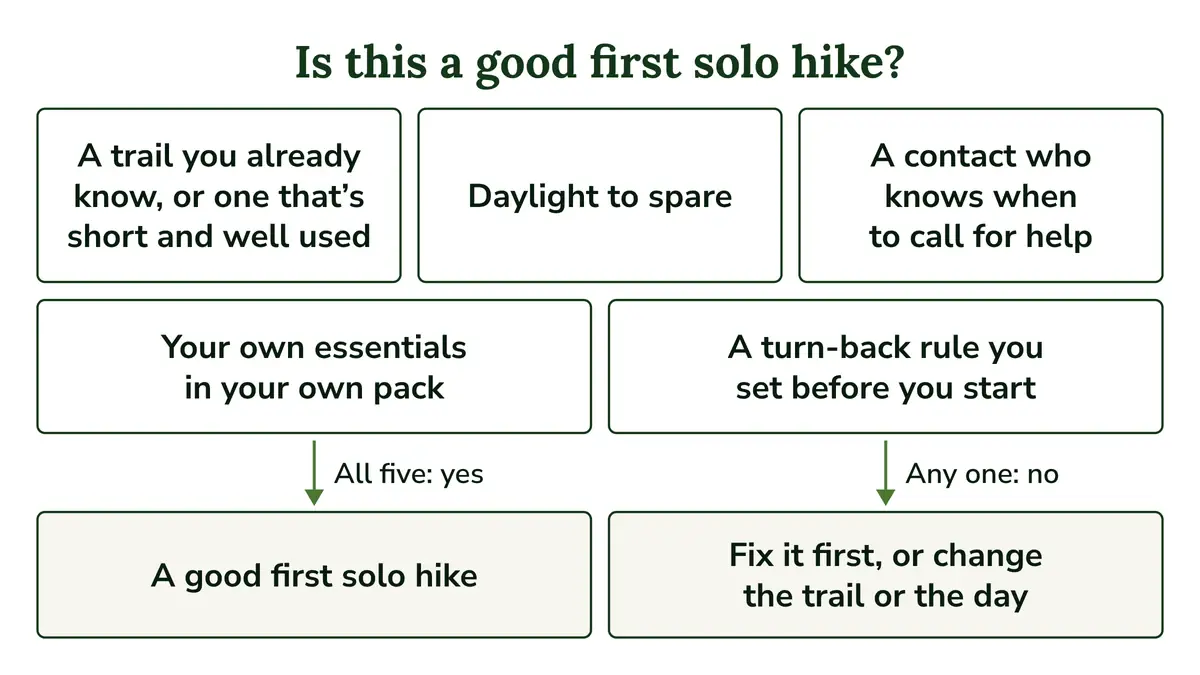
Alone, the trail itself does some of the safety work, so the way you pick one shifts a little. Before you commit, run it through these five checks:
- A trail you already know, or one that’s short and well used. On a busy trail someone can help you or report that you need help, and a familiar one removes some of the unknown.
- Daylight to spare. A slow descent or a wrong turn costs time, and alone there’s nobody to share the delay with, so you want light left over.
- A contact who knows when to call for help. Alone, they’re the only person who’ll notice you’re late. The check-in section below covers this.
- Your own essentials in your own pack. There’s no second pack to borrow from, so yours has to cover you.
- A turn-back rule you set before you start. A time, and the things that will send you back early, decided while you’re calm at home.
I’ve hiked alone myself, on a public trail leading into a park. For a first solo day I’d pick that kind of trail and make sure it’s a well-used one, so other people pass by often.
From there, build up. Start with smaller, easier outings on trails you know, then try a new trail of a similar size, and only later go longer or quieter. That way each step adds one unknown, not several at once.
There’s a real tradeoff here. If part of the pull of going alone is the quiet, a busy trail gives you more help nearby and less of the solitude you were after.
For the first few times, I’d take the busier trail anyway. The quiet ones will still be there once the routine feels normal.
Quick Tip: Decide your turnaround time before you leave home. The NPS Hike Smart advice is to set one and stick to it, so you don’t get caught out after dark.
Before you read on, think of one trail you know that fits the first two checks. The rest of this plan covers the other three.
The Check-In Routine: Who Knows Where You Are, and When They Call
Alone, your contact is the only person who’ll notice you’re late. Leave your plan with one friend or family member and check in when you’re back, as the Forest Service advises.
Then agree on the time they should call for help: the Appalachian Trail Conservancy suggests setting a check-in time and what to do if you miss it. Keep your real-time location off social media.
The Forest Service’s advice is to leave your itinerary with a friend or family member and check in with them when you get back. The Appalachian Trail Conservancy asks hikers on that trail to check in as often as they can.
Your friend would likely be glad to be your contact, but nobody has ever told them what to do with the plan. A plan with no call time just sits in their messages until someone wonders where you are.
That’s why I’d put the call time ahead of every other detail. Agree on one time: if they haven’t heard from you by then, they call for help, without waiting to see.
What to put in the plan itself is in my guide on how to leave a trip plan. A note left on your dashboard doesn’t count, because nobody reads it until someone is already looking for you.
The Conservancy also suggests being wary of posting your location or itinerary on social media in real time. A live post shows where you are right now to anyone who sees it, so share the photos once you’re home.
The routine does cost you something. Someone always knows where you are, which takes a small bite out of the getting-away part. I think a two-line text is a fair price for it.
Quick Tip: Agree on the exact time your contact should call for help if they haven’t heard from you, and text them the moment you’re back at the car.
At the Trailhead: Car Habits That Keep Your Options Open
The Park Service’s trailhead advice for the Appalachian Trail comes down to three habits. Keep your door open and keys handy until you start walking, so you can leave quickly if something feels off. Leave nothing valuable in sight, and don’t hang around the parking area before or after.
Pulling into a quiet parking area alone, the instinct is to sit in the car and sort out the map, the snacks and your boots. Do that at home instead, so you arrive ready to walk.
- Door open and keys handy until you’re ready to start. The NPS safety guidance for the Appalachian Trail suggests this so you can make a quick exit if anything feels wrong.
- No valuables or gear left in the car, especially in sight. Both the Park Service and the Conservancy say so, since a car at a trailhead sits unattended for hours.
- No lingering near the road or the trailhead. The Park Service advises against camping or hanging around there, so finish your prep at home and start walking.
None of this assumes trouble. It just keeps your choices open, which is the point of the whole plan.
On the Trail: What to Tell Strangers, What to Listen For, When to Turn Back
Strangers don’t need to know you’re alone or where you’re headed. If someone makes you uneasy, the Appalachian Trail Conservancy suggests saying you’re with a group behind you. Skip the headphones so you hear what’s around you, trust your instincts, and turn back when something feels wrong.
The Conservancy counts situational awareness among the best defenses a hiker has. That sounds more dramatic than it is: it mostly means paying attention to who’s around and what’s coming along the trail.
When Someone Asks If You’re Out Here Alone
A man coming the other way stops to chat and asks if you’re out here alone, and you feel rude not giving a straight answer. Being guarded with a stranger isn’t rude. You can be friendly and still keep your plans to yourself.
The Park Service’s guidance for the Appalachian Trail says there’s no need to broadcast that you’re hiking alone or to share your plans. The Appalachian Trail Conservancy’s advice is the same: don’t tell strangers your plans.
If someone does make you uneasy, the Conservancy suggests saying you’re with a group behind you and moving on as quickly as you can. That’s their standard advice for exactly this moment, so there’s nothing awkward about using it.
Quick Tip: The Appalachian Trail Conservancy’s suggested line is to say you are “with a group that is behind you.” Keep it ready, so you don’t have to come up with something on the spot.
Headphones, Earbuds and What You Can Hear
A National Park Service bear safety release puts it in one line: “Stay alert and avoid headphones on trails.” With both ears free, you hear a bike coming up behind you, a person approaching or an animal moving nearby before it’s right there.
I understand wanting music for company on a solo hike. Going without means less in your ears and more of what’s around you, and on a first solo day I’d leave both earbuds out.
If you choose one earbud anyway, that’s your call. Just go in knowing the cost: you’ll hear less.
Bear Spray: Only Where the Park Recommends It
Whether you carry bear spray depends on where you’re hiking. The Park Service’s advice is to check whether the park recommends bear spray, or allows it, for the activities you have planned.
Being alone matters in bear country too. The Park Service notes that groups are usually noisier and smellier than a single person, so a bear is more likely to notice a group coming.
On your own you’re quieter, so it’s worth following the Park Service’s bear safety reminder to make noise near streams, dense vegetation and blind corners.
Trusting Your Instincts and Turning Back
The Park Service’s guidance for the Appalachian Trail says to trust your instincts about strangers and be prepared to act on them. The Conservancy adds that a gut feeling is usually right, even when you can’t say why.
Turning back early is part of the plan, not a failure of it. The turn-back rule you set at home covers a person who makes you uneasy just as much as the weather or the clock.
If You Get Hurt With Nobody Around: What Being Alone Really Changes
Alone, there’s nobody to go for help if you’re hurt, and Yosemite Search and Rescue points out that with poor coverage, counting on being found may not be realistic. So take no extra risks, carry your own essentials, and if you’re injured, stay put so searchers start from your plan.
If the thought that keeps you home is “what if I sprain my ankle and nobody’s around?”, that’s a fair question. I’d turn the worry into three decisions you make before and during the hike.
Take No Extra Risks on the Day
In a post about an injured solo hiker, Yosemite Search and Rescue says people who hike alone take on additional risk. Their advice is to recognize that and “accept no further risks,” which includes staying away from exposed cliffs and stream crossings.
The reason is that there’s nobody to go for help. So the off-trail scramble or the stream crossing you might try with a friend waits for a day when you have company.
They also point out that where phone coverage is poor, counting on help arriving or someone finding you may not work as a plan if you’re badly hurt. That’s why the trail choice earlier matters so much: a busy trail keeps people within reach.
Carry Your Own Essentials
Alone, there’s no second pack to borrow from, so yours has to cover everything you’d normally share. Everything on my short list of the essentials for a day hike goes in your own pack.
If You’re Hurt, Stay Put
AdventureSmart’s advice is to stay put, because it cuts the time and the search area for the people looking for you. The National Park Service’s Outdoor Emergency Plan says the same: stay put, keep movement to a minimum, and move only if staying would put your life in immediate danger.
If you have a signal, call your local emergency number first and tell them where you are. If you don’t, the Park Service suggests flagging down someone who can get to a spot with reception and call for you, which is one more reason to start on a busy trail.
With no signal and nobody passing, this is where the check-in routine pays off. When your contact calls at the agreed time, the search starts from the plan you left, and you’re easiest to find if you’re still on it.
That’s the whole plan, and most of it happens before you leave the house. Before your first solo hike, pick the trail, set your turnaround time, and send your contact the plan with the time they should call.
Founder & Gear Research Editor
Sonia Zannoni
I’m Sonia, the founder of Best Trail Backpacks. I don’t test gear myself. For every pack I cover, I read the manufacturer’s specs and sizing charts and look for what owners report again and again.
Fit comes first, because a pack that doesn’t match your torso and hips will hurt no matter what it cost. My goal is to help you choose a pack that suits your body, your trip and your budget.
About the Founder
